Quarkus is one of the current trends of the Java ecosystem. I’m already in love with it. I’m using it along with Spring Boot, and when I choose, I choose Quarkus. 😁
This week, I was working on a Batch POC using Azure Functions and Azure Automation. So I thought it will be useful to share the exercise with you. 😁
What I want to do?#
I will be taking a small use case: I need a batch that will be invoked at some specific time or manually, checking all the available VMs and starting or shutting down all those that we choose.
What will I be using?#
We will be using:
- Azure Functions with Quarkus
- Azure Java SDK
- Azure Cosmos DB
What do we need?#
For this tutorial, we will need:
- Java 11
- Maven 3.6.3
- An Azure Subscription - you can get a free 12-month Azure Subscription along with 200$ credit here
- Azure Functions Core Tools v3
Building the Azure Functions with Quarkus#
Quarkus already has a Maven Archetype that creates a skull for an Azure Function in Java with Quarkus. Let’s use it, and we will discover in detail what it will bring. To generate a new project, just do:
 1
 2
 3
 4
 5
 6
 7
 8
 9
10
11
12
| $ mvn archetype:generate -B \
-DarchetypeGroupId=io.quarkus \
-DarchetypeArtifactId=quarkus-azure-functions-http-archetype \
-DarchetypeVersion=1.12.0.Final \
-DjavaVersion=11 \
-DgroupId=com.targa.labs.dev \
-DartifactId=azure-quarkus-func \
-Dversion=1.0.0-SNAPSHOT \
-DappName=azure-resources-handler \
-DappRegion=northeurope \
-Dfunction=azure-resources-handler \
-DresourceGroup=helloworld-rg
|
This Maven command will generate, in a batch mode (non-interactive), a Java Azure Function project with:
- Quarkus version:
1.12.0.Final - Java version:
11 - The Group Id:
com.targa.labs.dev - The Artifact Id:
azure-quarkus-func - The project version:
1.0.0-SNAPSHOT
There are also some specifications for the Azure Function Application:
- Resource Group:
helloworld-rg - Azure Function Application Region:
North Europe - Azure Function Application Name:
azure-resources-handler
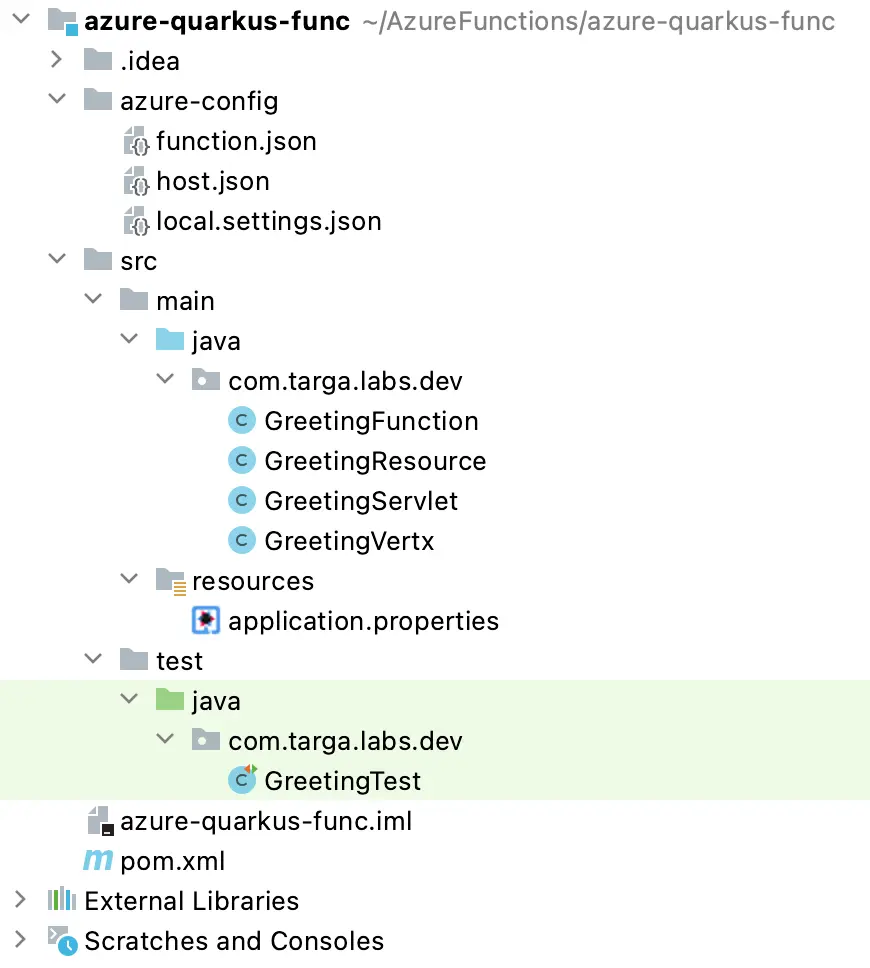
After generating the project, its structure will look like:
You can notice here that there is an extra folder that we are not used to in regular Maven projects. Ok, what is this azure-config folder?
In the azure-config folder, we have three JSON files:
function.json: binding configuration file - used to define how the function will be triggered. The default generated config is for HTTP Trigger: means that the function will be triggered using HTTP Requestshost.json: function configuration file - used to active/deactivate the Extensions Bundlelocal.settings.json: credentials and settings file - used to
For more information about these files, you can check this previous post about Java Azure Functions: Playing with Java in Azure Functions
Next, in the Java classes, you can notice these 4 Greeting_SOMETHING_ classes. These four classes are the four ways of exposing REST APIs:
- Using JAX-RS: Java EE compliant implementation
- Using Servlets: Java EE compliant implementation
- Using the Eclipse Vert.x: The Event-Driven application framework used for creating Reactive Applications
- Using the Funky Framework 😂 no ! seriously, its name is Funqy Framework: a Java library from the Quarkus family used for creating Serverless Functions that can be deployed to many Function-as-Service Solutions like Azure Function or AWS Lambda…
These four classes come with their respective Maven Dependencies, listed already in the pom.xml:
 1
 2
 3
 4
 5
 6
 7
 8
 9
10
11
12
13
14
15
16
17
18
19
20
21
22
23
| <dependencies>
<!-- remove if not using jaxrs -->
<dependency>
<groupId>io.quarkus</groupId>
<artifactId>quarkus-resteasy</artifactId>
</dependency>
<!-- remove if not using servlets -->
<dependency>
<groupId>io.quarkus</groupId>
<artifactId>quarkus-undertow</artifactId>
</dependency>
<!-- remove if not using vertx web -->
<dependency>
<groupId>io.quarkus</groupId>
<artifactId>quarkus-vertx-web</artifactId>
</dependency>
<!-- remove if not using funqy -->
<dependency>
<groupId>io.quarkus</groupId>
<artifactId>quarkus-funqy-http</artifactId>
</dependency>
...
</dependencies>
|
Cool! 😁 I will be using JAX-RS only in this tutorial.
Good! Now, we will test this sample project with this Maven command:
1
| $ mvn clean install -DskipTests azure-functions:run
|
The build will start, and the most important part is the one from the azure-functions-maven-plugin:
 1
 2
 3
 4
 5
 6
 7
 8
 9
10
11
12
13
14
15
16
17
18
19
20
21
| [INFO] Scanning for projects...
[INFO]
[INFO] ---------------< com.targa.labs.dev:azure-quarkus-func >----------------
[INFO] Building azure-quarkus-func 1.0.0-SNAPSHOT
[INFO] --------------------------------[ jar ]---------------------------------
...
[INFO] --- azure-functions-maven-plugin:1.9.2:run (default-cli) @ azure-quarkus-func ---
...
[INFO] Azure Function App's staging directory found at: /home/nebrass/java/functions/azure-quarkus-function/target/azure-functions/quarkus-function
[INFO] Azure Functions Core Tools found.
Azure Functions Core Tools
Core Tools Version: 3.0.3284 Commit hash: 98bc25e668274edd175a1647fe5a9bc4ffb6887d
Function Runtime Version: 3.0.15371.0
...
Functions:
azure-resources-handler: [GET,POST,HEAD,PUT,OPTIONS,DELETE] http://localhost:7071/api/{*path}
[2021-02-26T22:34:05.752Z] Worker process started and initialized.
[2021-02-26T22:34:10.399Z] Host lock lease acquired by instance ID '000000000000000000000000D5E3A1F8'.
|
You can notice that the plugin listed the “azure-resources-handler” function is available under http://localhost:7071/api/{*path}, and the support HTTP verbs are GET, POST, HEAD, PUT, OPTION, DELETE. This list of verbs is provided from the function.json file, in the bindings configuration section:
 1
 2
 3
 4
 5
 6
 7
 8
 9
10
11
12
13
14
15
16
17
| {
"scriptFile" : "../${project.build.finalName}.jar",
"entryPoint" : "io.quarkus.azure.functions.resteasy.runtime.Function.run",
"bindings" : [ {
"type" : "httpTrigger",
"direction" : "in",
"name" : "req",
"route" : "{*path}",
"methods" : [ "GET", "POST", "HEAD", "PUT", "OPTIONS", "DELETE" ],
"dataType" : "binary",
"authLevel" : "ANONYMOUS"
}, {
"type" : "http",
"direction" : "out",
"name" : "$return"
} ]
}
|
If you want to restrict access to a specific HTTP verb, it’s here where you can tune your HTTP Triggered function. 😁
We will now implement the first API, which will be returning the list of VMs information: VM Name and its Resource Group and Status (running or not). We will create a DTO class that will represent the VM info that we want:
1
2
3
4
5
6
7
8
| @Data
@AllArgsConstructor
@NoArgsConstructor
public class VmDTO {
private String name;
private String status;
private String resourceGroup;
}
|
⚠️ We need to add the Lombok Framework library to the pom.xml
To do that, we need to use the Azure SDK Java Libraries. We start by adding the Azure Resource Manager SDK. The Resource Manager in Azure is the main component that we ask for handling (creating, removing, etc..) any given resource.
The Azure SDK team provides developer docs. You can know more about the Resource Manager SDK at https://azure.github.io/azure-sdk-for-java/resources.html.
So, first of all, we need to add this dependency to the pom.xml:
1
2
3
4
5
| <dependency>
<groupId>com.azure.resourcemanager</groupId>
<artifactId>azure-resourcemanager</artifactId>
<version>2.2.0</version>
</dependency>
|
Now we will create the VmManager: a class that will be accessing the Azure Resource Manager API to do the VMs operations. But this communication with the API will need security credentials like a Token. So, we need to add another library that can help the VmManager authenticate to the Azure API. This library will be the Azure Identity. So we need to add its dependency to the pom.xml:
1
2
3
4
5
| <dependency>
<groupId>com.azure</groupId>
<artifactId>azure-identity</artifactId>
<version>1.2.3</version>
</dependency>
|
Good 😁 This Identity library will help the application access the API using some credentials that I need to provide to the application, like a Login and Password. But this is an application, not a human. This is why I will create an Azure Service Principal that will identify and authenticate our application to access the Azure Resources. Based on the Microsoft Docs:
An Azure service principal is an identity created for use with applications, hosted services, and automated tools to access Azure resources. This access is restricted by the roles assigned to the service principal, giving you control over which resources can be accessed and at which level. For security reasons, it’s always recommended to use service principals with automated tools rather than allowing them to log in with a user identity.
First of all, you need to be authenticated to Azure CLI using the az login command. Then, to create the Service Principal, just do:
1
| $ az ad sp create-for-rbac --name QuarkusServicePrincipal
|
The command output will look like:
1
2
3
4
5
6
7
| {
"appId": "856f5c37-a639-4e1e-b294-e6391c396698",
"displayName": "QuarkusServicePrincipal",
"name": "http://QuarkusServicePrincipal",
"password": "M6_6OF4q9t-kNrKISZG-0p0qv-FnZ8EdM~",
"tenant": "2cf6bd3b-ef71-47c4-9d5d-06abe42bb3a6"
}
|
Our application will use these credentials to authenticate against the Azure API:
- The
appId is the Client ID 👉️ needs to be defined in the Environment Variables as AZURE_CLIENT_ID - The
password is the Client Secret 👉️ needs to be defined in the Environment Variables as AZURE_CLIENT_SECRET - The
tenant 👉️ needs to be defined in the Environment Variables as AZURE_TENANT_ID
These credentials need to be defined in the Environment Variables, as our Azure Identity components will seek these values from the Environment. This design is better than inserting the credentials directly in the source code or in the properties files.
To create an AzureResourceManager instance using these credentials, just use this snippet:
1
2
3
4
5
6
7
8
| AzureProfile profile = new AzureProfile(AzureEnvironment.AZURE);
TokenCredential credential = new DefaultAzureCredentialBuilder()
.authorityHost(profile.getEnvironment().getActiveDirectoryEndpoint())
.build();
AzureResourceManager azureResourceManager = AzureResourceManager
.authenticate(credential, profile)
.withDefaultSubscription();
|
Now we can implement the getAvailableVms() method:
 1
 2
 3
 4
 5
 6
 7
 8
 9
10
11
12
13
14
15
16
17
18
19
20
21
22
23
24
25
26
27
28
29
30
31
32
33
34
35
36
37
38
39
40
41
42
| @ApplicationScoped
public class AzureVmManager {
private final AzureResourceManager azureResourceManager;
public AzureVmManager() {
AzureProfile profile = new AzureProfile(AzureEnvironment.AZURE);
TokenCredential credential = new DefaultAzureCredentialBuilder()
.authorityHost(profile.getEnvironment().getActiveDirectoryEndpoint())
.build();
azureResourceManager = AzureResourceManager
.authenticate(credential, profile)
.withDefaultSubscription();
}
public List<VmDTO> getAvailableVMs() {
List<String> rgList = azureResourceManager.resourceGroups()
.list()
.stream()
.map(HasName::name)
.collect(Collectors.toList());
List<VmDTO> vmList = new ArrayList<>();
for (String resourceGroup : rgList) {
azureResourceManager.virtualMachines()
.listByResourceGroup(resourceGroup)
.forEach(vm -> vmList.add(
new VmDTO(
vm.name(),
vm.powerState().toString(),
resourceGroup
)
));
}
return vmList;
}
}
|
In the getAvailableVms() method, we list the resource groups, and for every resource group, we list its VMs.
Good 😄 Now let’s edit the REST Resource to send the List of VmDTOs:
 1
 2
 3
 4
 5
 6
 7
 8
 9
10
11
12
| @Path("/vms")
public class VMsResource {
@Inject
AzureVmManager azureVmManager;
@GET
@Produces(MediaType.APPLICATION_JSON)
public List<VmDTO> getAvailableVMs() {
return azureVmManager.getAvailableVMs();
}
}
|
Let’s test the project now. Just do this Maven command:
1
| $ mvn clean install -DskipTests azure-functions:run
|
Then, if you open the http://localhost:7071/api/vms URL, the result will look like:
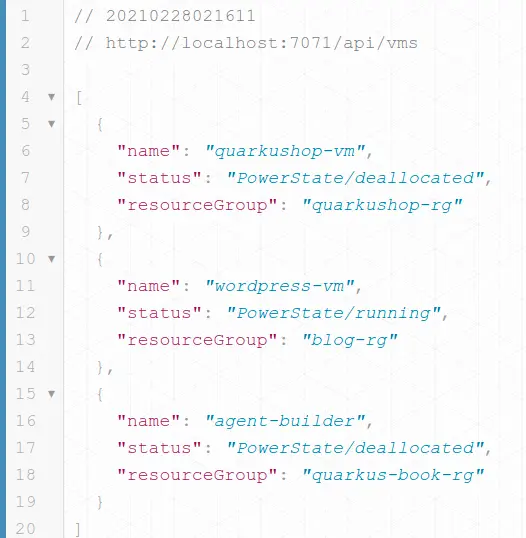
Don’t be scared if you got an empty array 😅 Be sure that you already have some VMs in your subscription.
Next, we will implement the Start and Stop VM methods in the AzureVmManager class:
1
2
3
4
5
6
7
8
9
| ...
public void startVM(VmDTO vmDTO) {
azureResourceManager.virtualMachines().start(vmDTO.getResourceGroup(), vmDTO.getName());
}
public void stopVM(VmDTO vmDTO) {
azureResourceManager.virtualMachines().deallocate(vmDTO.getResourceGroup(), vmDTO.getName());
}
}
|
Then, we need to expose them in the REST API:
 1
 2
 3
 4
 5
 6
 7
 8
 9
10
11
12
13
| @POST
@Path("/start")
@Consumes(MediaType.APPLICATION_JSON)
public void startVM(VmDTO vmDTO){
azureVmManager.startVM(vmDTO);
}
@POST
@Path("/stop")
@Consumes(MediaType.APPLICATION_JSON)
public void stopVM(VmDTO vmDTO){
azureVmManager.stopVM(vmDTO);
}
|
Excellent! 🥳 Now we will add the scenario of storing the start/stop events to the Azure Cosmos DB.
But before, we need to create the Event model class:
 1
 2
 3
 4
 5
 6
 7
 8
 9
10
11
12
13
14
15
16
17
18
19
20
21
22
23
| @Data
@AllArgsConstructor
@NoArgsConstructor
public class VmEvent {
private VmEventType type;
private String id;
private String name;
private String resourceGroup;
private Date date;
public VmEvent(VmEventType type, String name, String resourceGroup) {
this.type = type;
this.name = name;
this.resourceGroup = resourceGroup;
this.id = UUID.randomUUID().toString();
this.date = new Date();
}
}
enum VmEventType {
START,
STOP;
}
|
Let’s play with CosmosDB now! 🤩
Adding Azure CosmosDB to the Game#
The first step is to create:
- a new CosmosDB account if you don’t have one already
- a new CosmosDB database and name it
events-db - a new CosmosDB container and name it
events with /name as Partition key
Then keep aside the Connection String as our application will use it in order to access the Cosmos DB.
If you didn’t that before, you can find a guided tutorial about Azure Cosmos DB here.
The Connection String needs to be added to the local.settings.json file, under the “CosmosDbConnection” entry.
Now, we will need to add the CosmosDB Client to the AzureVmManager class. But, before that, we need to have a method that can be parsing the Connection String to extract the required credentials which are needed for authenticating the Cosmos DB Client.
The Connection String has the format: AccountEndpoint=https://xxxxxxxx.documents.azure.com:443/;AccountKey=RpiUBg4mK0xBIKqPRpiUBg4mK0xBIKqP==;
To parse it, I will split the AccountEndpoint and AccountKey parts using the ; sign, and then I will split the KEY=VALUE expression using the = sign. Then I will be storing these credentials in a Map.
My getCosmosDbCredentials() method looks like:
 1
 2
 3
 4
 5
 6
 7
 8
 9
10
11
12
13
| private Map<String, String> getCosmosDbCredentials() {
Map<String, String> credentials = new HashMap<>();
String cosmosDbConnection = System.getenv("CosmosDbConnection");
String[] elements = cosmosDbConnection.split(";");
for (String element : elements) {
String[] split = element.split("=");
credentials.put(split[0], split[1]);
}
return credentials;
}
|
The System.getenv("CosmosDbConnection") instruction will grab the CosmosDbConnection from the System Environment Variables. This is will work, as we added the “CosmosDbConnection” entry to the local.settings.json, then, Azure Function Runtime will make this entry available as an Environment Variable.
Excellent! Now, if to instantiate the CosmosClient we will do:
 1
 2
 3
 4
 5
 6
 7
 8
 9
10
11
12
13
14
| AzureResourceManager azureResourceManager = AzureResourceManager
.authenticate(credential, profile)
.withDefaultSubscription();
Map<String, String> credentials = getCosmosDbCredentials();
CosmosClient cosmosClient = new CosmosClientBuilder()
.endpoint(credentials.get("AccountEndpoint"))
.key(credentials.get("AccountKey"))
.buildClient();
cosmosContainer = cosmosClient
.getDatabase("events-db")
.getContainer("events");
|
Then, we will use the cosmosContainer to do the CRUD operations in the Azure Cosmos DB. To insert a VmEvent into CosmosDB, we create the method sendData():
1
2
3
| public void sendData(VmEvent vmEvent) {
cosmosContainer.createItem(vmEvent);
}
|
We will include this method into the start/stop VM methods:
 1
 2
 3
 4
 5
 6
 7
 8
 9
10
11
12
13
| public void startVM(VmDTO vmDTO) {
azureResourceManager.virtualMachines().start(vmDTO.getResourceGroup(), vmDTO.getName());
sendData(
new VmEvent(VmEventType.START, vmDTO.getName(), vmDTO.getResourceGroup())
);
}
public void stopVM(VmDTO vmDTO) {
azureResourceManager.virtualMachines().deallocate(vmDTO.getResourceGroup(), vmDTO.getName());
sendData(
new VmEvent(VmEventType.STOP, vmDTO.getName(), vmDTO.getResourceGroup())
);
}
|
Then, we will create a method that grabs the stored events - in the AzureVmManager:
1
2
3
4
5
6
7
8
| public List<VmEvent> getLogs() {
String SELECT_ALL_LOGS_QUERY = "SELECT * FROM c";
return cosmosContainer
.queryItems(SELECT_ALL_LOGS_QUERY, new CosmosQueryRequestOptions(), VmEvent.class)
.stream()
.collect(Collectors.toList());
}
|
Next, we will expose the getLogs() in the REST Resource:
1
2
3
4
5
6
| @GET
@Path("/logs")
@Produces(MediaType.APPLICATION_JSON)
public List<VmEvent> logs(){
return azureVmManager.getLogs();
}
|
Excellent! Now, let’s run this function locally using the command:
1
| $ mvn clean install -DskipTests azure-functions:run
|
After the application starts, we will use the list available VMs API, then we will choose a VM, and will start or stop many times, then we will check the get Logs API in order to get the events.
ℹ️ I will use the HTTPie as a REST CLI
Get the VMs:
 1
 2
 3
 4
 5
 6
 7
 8
 9
10
11
12
13
14
15
16
17
18
19
20
21
22
23
24
25
| http http://localhost:7071/api/vms
HTTP/1.1 200 OK
Content-Length: 265
Content-Type: application/json
Date: Tue, 02 Mar 2021 16:53:15 GMT
Server: Kestrel
[
{
"name": "quarkushop-vm",
"resourceGroup": "quarkushop-rg",
"status": "PowerState/deallocated"
},
{
"name": "wordpress-vm",
"resourceGroup": "blog-rg",
"status": "PowerState/running"
},
{
"name": "agent-builder",
"resourceGroup": "quarkus-book-rg",
"status": "PowerState/deallocated"
}
]
|
Start the quarkus-vm machine:
1
2
3
4
5
6
7
| echo '{ "name": "quarkushop-vm", "resourceGroup": "quarkushop-rg" }' \
| http POST http://localhost:7071/api/vms/start --timeout=300
HTTP/1.1 204 No Content
Content-Length: 0
Date: Tue, 02 Mar 2021 16:47:53 GMT
Server: Kestrel
|
Stop it:
1
2
3
4
5
6
7
| echo '{ "name": "quarkushop-vm", "resourceGroup": "quarkushop-rg" }' \
| http POST http://localhost:7071/api/vms/stop --timeout=300
HTTP/1.1 204 No Content
Content-Length: 0
Date: Tue, 02 Mar 2021 16:48:51 GMT
Server: Kestrel
|
⚠️ Be sure to have the --timeout=300 in the HTTPie command, because the REST call can take more than 30 seconds, which is the default HTTPie timeout.
Then we will get the Logs:
 1
 2
 3
 4
 5
 6
 7
 8
 9
10
11
12
13
14
15
16
17
18
19
20
21
22
23
24
25
26
27
28
29
30
31
32
33
34
35
36
37
38
| http http://localhost:7071/api/vms/logs
HTTP/1.1 200 OK
Content-Length: 1366
Content-Type: application/json
Date: Tue, 02 Mar 2021 16:59:12 GMT
Server: Kestrel
[
{
"date": 1614703368791,
"id": "f33e9ed4-086d-4ccf-88d5-f4f4f32ba74e",
"name": "quarkushop-vm",
"resourceGroup": "quarkushop-rg",
"type": "START"
},
{
"date": 1614703445766,
"id": "bb03fb09-e07a-4182-8429-baa48cf43b35",
"name": "quarkushop-vm",
"resourceGroup": "quarkushop-rg",
"type": "STOP"
},
{
"date": 1614703604793,
"id": "ce8c06fe-d00b-47ba-a0e3-38670fc2878e",
"name": "quarkushop-vm",
"resourceGroup": "quarkushop-rg",
"type": "START"
},
{
"date": 1614703674713,
"id": "a14f24e8-2b23-4f61-bb6c-c9154d839410",
"name": "quarkushop-vm",
"resourceGroup": "quarkushop-rg",
"type": "STOP"
}
]
|
Excellent, this data can be then used in your monitoring dashboards or monitoring services. Cool! Let’s deploy now our Azure Function Application 😁
Deploying the Quarkus Azure Function#
As usual, it’s a very easy task: only one Maven Task will do the job 🤩 Just be sure that the Azure CLI is authenticated:
1
| $ mvn clean install -DskipTests azure-functions:deploy
|
The process will take some time, then you will get an output that looks like:
 1
 2
 3
 4
 5
 6
 7
 8
 9
10
| ....
[INFO] Syncing triggers and fetching function information (Attempt 1/3)...
[INFO] HTTP Trigger Urls:
[INFO] quarkus-function : https://quarkus-function.azurewebsites.net/api/{*path}
[INFO] ------------------------------------------------------------------------
[INFO] BUILD SUCCESS
[INFO] ------------------------------------------------------------------------
[INFO] Total time: 01:59 min
[INFO] Finished at: 2021-03-02T18:12:39+01:00
[INFO] ------------------------------------------------------------------------
|
In theory, the application will work now 😆 but it’s not the case, yet!
We need to provide the AZURE_CLIENT_ID, AZURE_CLIENT_SECRET, AZURE_TENANT_ID along with the CosmosDbConnection to the Function Environment. To do that, just go to the Azure portal and then go to the Function App menu. Then go to the Configuration menu in order to access the Function Environment Variables, here where you need to add the required items:

Excellent! Now, our Quarkus Function is ready for receiving our requests, let’s test it:
 1
 2
 3
 4
 5
 6
 7
 8
 9
10
11
12
13
14
15
16
17
18
19
20
21
22
23
24
25
26
27
28
29
30
31
32
33
34
35
36
37
38
39
40
| http https://quarkus-function.azurewebsites.net/api/vms/logs
HTTP/1.1 200 OK
Content-Encoding: gzip
Content-Type: application/json
Date: Tue, 02 Mar 2021 17:25:27 GMT
Request-Context: appId=cid-v1:a3251f24-8fcf-429f-8f94-07eae258f122
Transfer-Encoding: chunked
Vary: Accept-Encoding
[
{
"date": 1614703368791,
"id": "f33e9ed4-086d-4ccf-88d5-f4f4f32ba74e",
"name": "quarkushop-vm",
"resourceGroup": "quarkushop-rg",
"type": "START"
},
{
"date": 1614703445766,
"id": "bb03fb09-e07a-4182-8429-baa48cf43b35",
"name": "quarkushop-vm",
"resourceGroup": "quarkushop-rg",
"type": "STOP"
},
{
"date": 1614703604793,
"id": "ce8c06fe-d00b-47ba-a0e3-38670fc2878e",
"name": "quarkushop-vm",
"resourceGroup": "quarkushop-rg",
"type": "START"
},
{
"date": 1614703674713,
"id": "a14f24e8-2b23-4f61-bb6c-c9154d839410",
"name": "quarkushop-vm",
"resourceGroup": "quarkushop-rg",
"type": "STOP"
}
]
|
Enjoy the game!
Conclusion#
In this tutorial, we learned how to use the Quarkus Azure Functions HTTP library and how to use Quarkus to create a powerful Azure Function 😅
The source code of this application is available here.