
What is Istio?
Google presents Istio as an open platform to connect, monitor, and secure microservices.
Istio is a service mesh implementation that provides many cloud-native capabilities like:
- Traffic management: Service Discovery, Load balancing, Failure recovery, A/B testing, Canary releases, etc…
- Observability: Request Tracing, Metrics, Monitoring, Auditing, Logging, etc…
- Security: ACLs, Access control, Rate limiting, End-to-end authentication, etc…
Istio delivers all these great features without any changes to the code of the microservices running with it on the same Kubernetes cluster.
In our case, we already implemented many of these features and capabilities when we were writing our microservices. If we had Istio at the beginning, we could save so much effort and time, by delegating all of these capabilities to Istio.
Istio Architecture
Istio service mesh is composed of two parts:
- The data plane is responsible for establishing, securing, and controlling the traffic through the Service Mesh. The management components that instruct the data plane how to behave is known as the “control plane”.
- The control plane is the brains of the mesh and exposes an API for operators to manipulate the network behaviors.
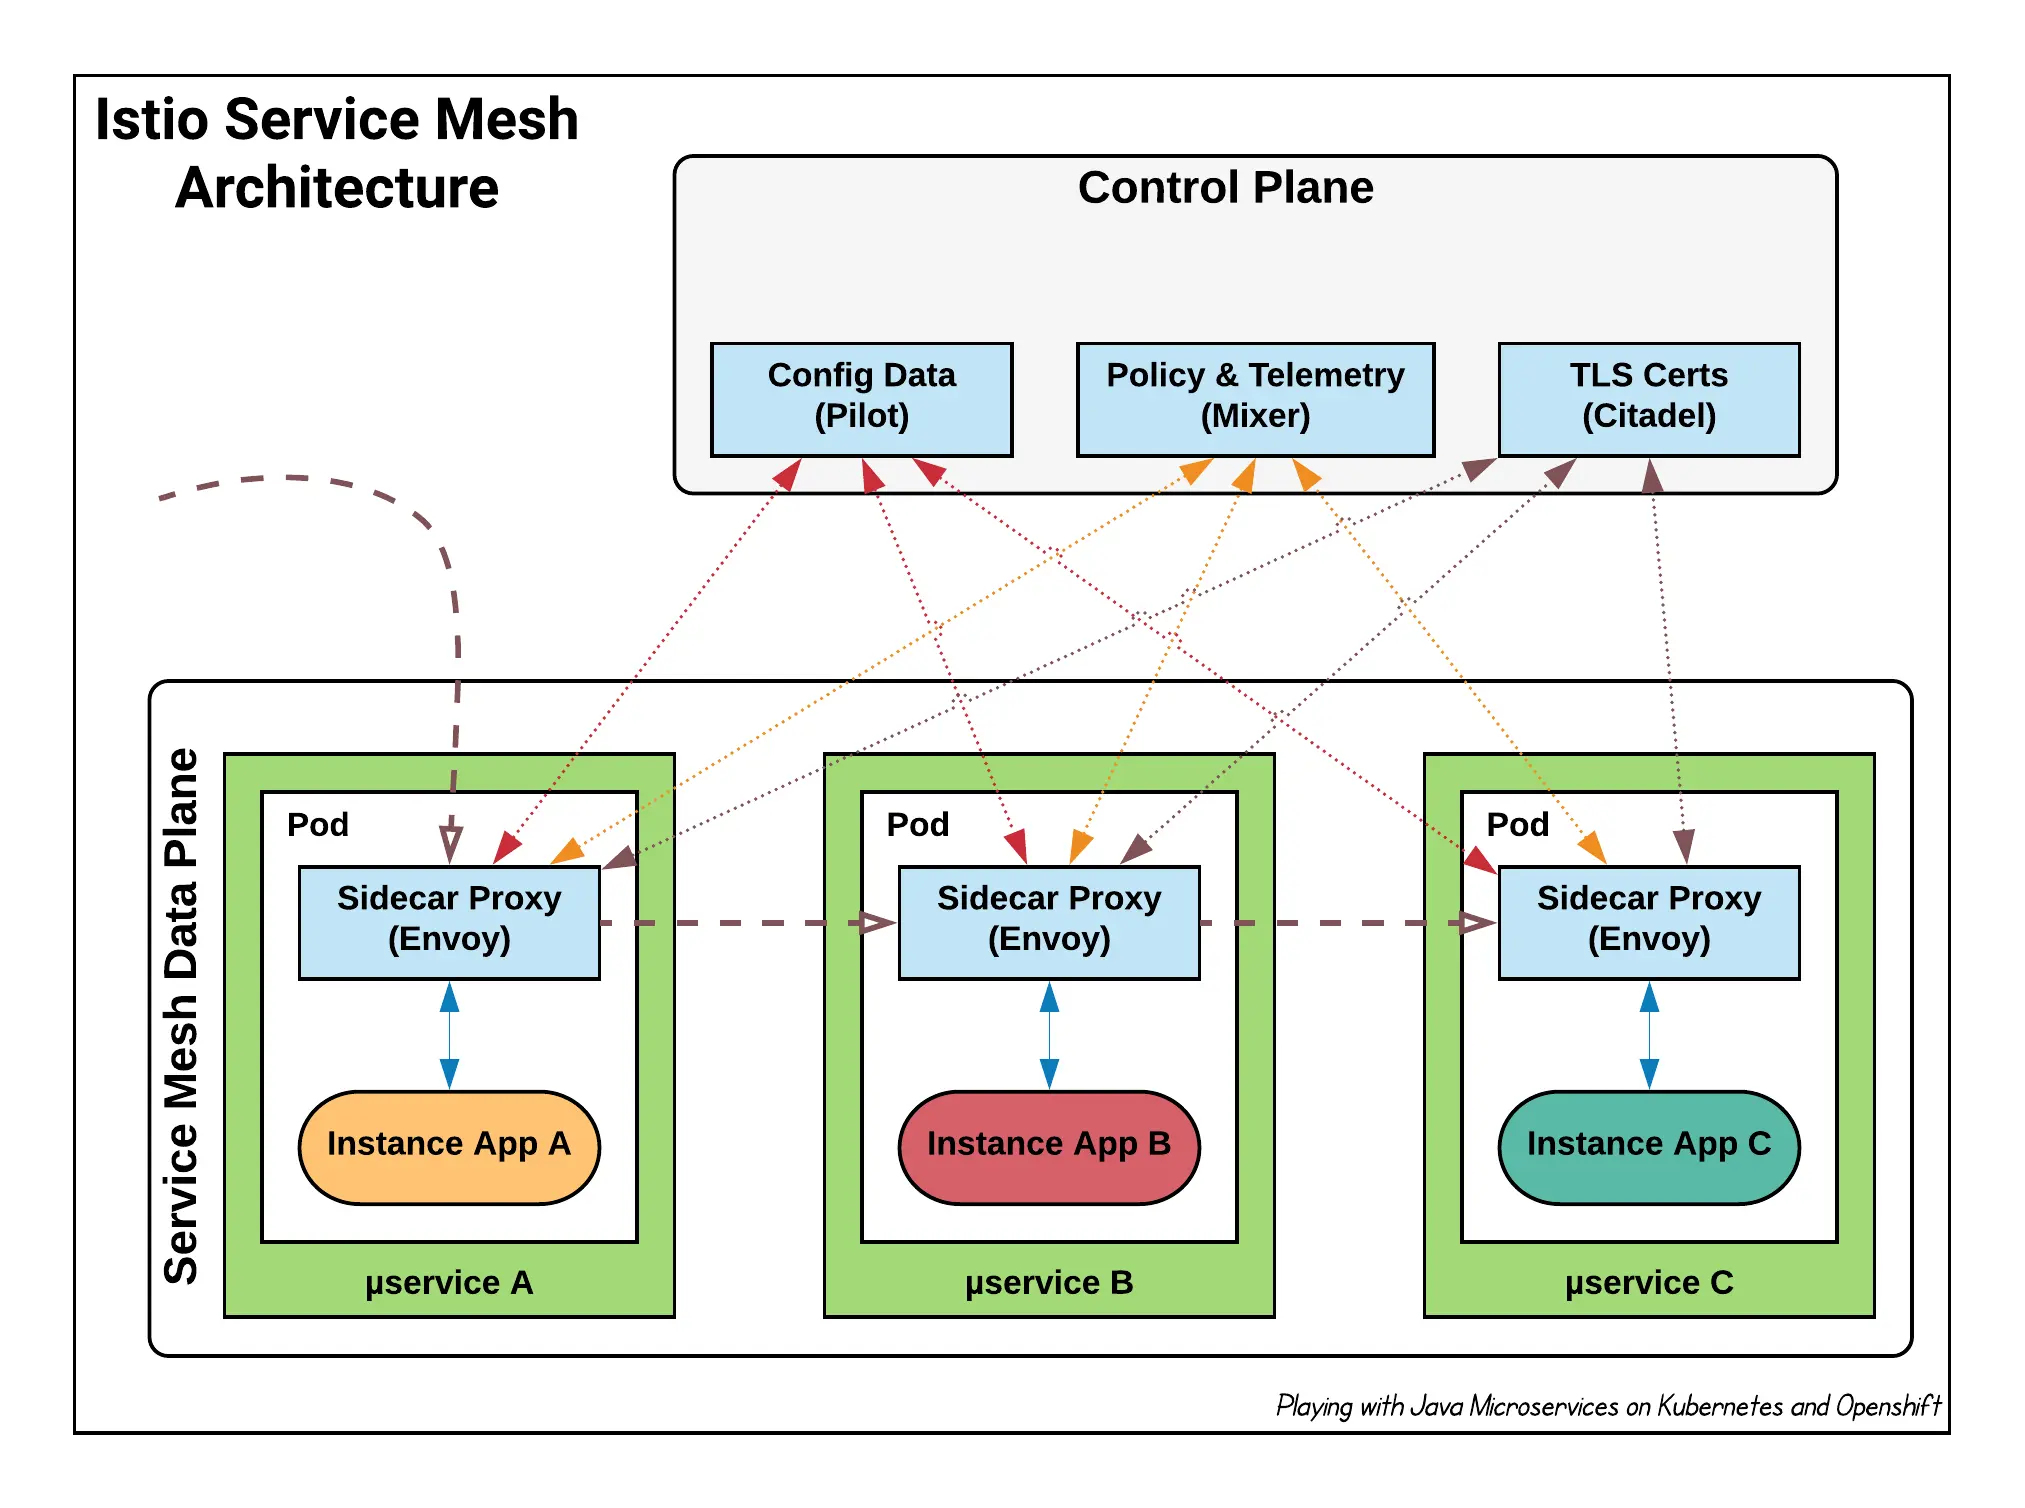
Istio Components
From the Istio Architecture diagram, we can see different components, located in different areas of the ecosystem:
Envoy
Sidecar proxies per microservice to handle ingress/egress traffic between services in the cluster and from a service to external services. The proxies form a secure microservice mesh providing a rich set of functions like discovery, rich layer-7 routing, circuit breakers, policy enforcement and telemetry recording/reporting functions.
The service mesh is not an overlay network. It simplifies and enhances how microservices in an application talk to each other over the network provided by the underlying platform.
Envoy is deployed as a sidecar to the relevant microservice in the same Kubernetes pod. This deployment allows Istio to extract a wealth of signals about traffic behavior as attributes. Istio can, in turn, use these attributes in Mixer to enforce policy decisions, and send them to monitoring systems to provide information about the behavior of the entire mesh.
Mixer
Mixer is a central component that is leveraged by the proxies and microservices to enforce policies such as authorization, rate limits, quotas, authentication, request tracing and telemetry collection.
Mixer includes a flexible plugin model. This model enables Istio to interface with a variety of host environments and infrastructure backends. Thus, Istio abstracts the Envoy proxy and Istio-managed services from these details.
Pilot
Pilot provides service discovery for the Envoy sidecars, traffic management capabilities for intelligent routing (e.g., A/B tests, canary deployments, etc.), and resiliency (timeouts, retries, circuit breakers, etc.).
Pilot converts high level routing rules that control traffic behavior into Envoy-specific configurations, and propagates them to the sidecars at runtime. Pilot abstracts platform-specific service discovery mechanisms and synthesizes them into a standard format that any sidecar conforming with the Envoy data plane APIs can consume. This loose coupling allows Istio to run on multiple environments such as Kubernetes, Consul, or Nomad, while maintaining the same operator interface for traffic management.
Citadel
Citadel provides strong service-to-service and end-user authentication with built-in identity and credential management. You can use Citadel to upgrade unencrypted traffic in the service mesh. Using Citadel, operators can enforce policies based on service identity rather than on network controls. Starting from release 0.5, you can use Istio’s authorization feature to control who can access your services.
Galley
Galley validates user authored Istio API configuration on behalf of the other Istio control plane components. Over time, Galley will take over responsibility as the top-level configuration ingestion, processing and distribution component of Istio. It will be responsible for insulating the rest of the Istio components from the details of obtaining user configuration from the underlying platform (e.g. Kubernetes).
Getting started with Istio
Requirements
We will be playing with Istio on Kubernetes. For testing the solution, you need to have, as usual, a running Minikube on your machine.
The example of this chapter will be running on Minikube v0.35.0 with a custom config: 4 CPUs with 8Go of Memory.
Get & Install Istio
To start downloading and installing Istio, just enter the following command:
| |
By the end of the command execution, you will see some message like this one:
| |
Next, we will move to Istio package directory:
| |
As the first step, you have to install Istio’s Custom Resources Definition:
| |
What is Custom Resources Definition ?
Custom resources definition (CRD) is a powerful feature introduced in Kubernetes 1.7 which enables users to add their own/custom objects to the Kubernetes cluster and use it like any other native Kubernetes objects.
Next, we need to install Istio’s core components. We have four different options to do this:
- Option 1: Install Istio WITHOUT mutual TLS authentication between sidecars
- Option 2: Install Istio WITH default mutual TLS authentication
- Option 3: Render Kubernetes manifest with Helm and deploy with kubectl
- Option 4: Use Helm and Tiller to manage the Istio deployment
For a production setup of Istio, it’s recommended to install with the Helm Chart (Option 4), to use all the configuration options. This permits customization of Istio to operator specific requirements.
In this tutorial, we will be using the Option 1:
To install Istio:
| |
Verifying the installation
To be sure that the Istio components were correctly installed, these Kubernetes Services needs to be installed: istio-pilot, istio-ingressgateway, istio-policy, istio-telemetry, prometheus, istio-galley, and (optionally) istio-sidecar-injector:
| |
For the Kubernetes Services already listed, we will find corresponding Pods:
| |
All Pods need to be in the Running status, except the istio-cleanup-secrets-*, istio-grafana-post-install-* and istio-security-post-install-* Pods, which will be in the Completed status. These three Completed Pods are started and executed at a post-installation phase, to do post-installation tasks like cleaning the installation secrets, etc…
Envoy Sidecar Injection
In the service mesh world, a sidecar is a utility container in the pod, and its purpose is to support the main container. In the Istio case, the sidecar will be an Envoy proxy that will be deployed to each pod. The process of adding Envoy into a pod is called Sidecar Injection. This action can be done in two ways:
- Automatically using the Istio Sidecar Injector : Automatic injection injects at pod creation time. The controller resource is unmodified. Sidecars can be updated selectively by manually deleting a pods or systematically with a deployment rolling update.
- Manually using the Istioctl-CLI tool: Manual injection modifies the controller configuration, e.g. deployment. It does this by modifying the pod template spec such that all pods for that deployment are created with the injected sidecar. Adding, Updating or Removing the sidecar requires modifying the entire deployment.
Automatic Sidecar Injection
To enable the Automatic Sidecar Inject just add the istio-injection label to the Kubernetes namespace: For example to enable it in the default namespace:
| |
Now, when a pod will be created, the Envoy sidecar is automatically injected inside it.
Manual Sidecar Injection
Inject the sidecar into the deployment using the in-cluster configuration. <1>
| |
BookInfo Sample Application
This example deploys a sample application composed of four separate microservices used to demonstrate various Istio features. The lication displays information about a book, similar to a single catalog entry of an online book store. Displayed on the page is a cription of the book, book details (ISBN, number of pages, and so on), and a few book reviews.
The Bookinfo application is broken into four separate microservices:
productpage: Theproductpagemicroservice calls the details and reviews microservices to populate the page.details: Thedetailsmicroservice contains book information.reviews: Thereviewsmicroservice contains book reviews. It also calls the ratings microservice.ratings: Theratingsmicroservice contains book ranking information that accompanies a book review.There are 3 versions of the reviews microservice:
- Version v1 doesn’t call the ratings service.
- Version v2 calls the ratings service, and displays each rating as 1 to 5 black stars.
- Version v3 calls the ratings service, and displays each rating as 1 to 5 red stars.
These two commands can be done in one command:
| |
or also:
| |
These commands will inject the Istio Envoy sidecar into the Kubernetes Deployment object.
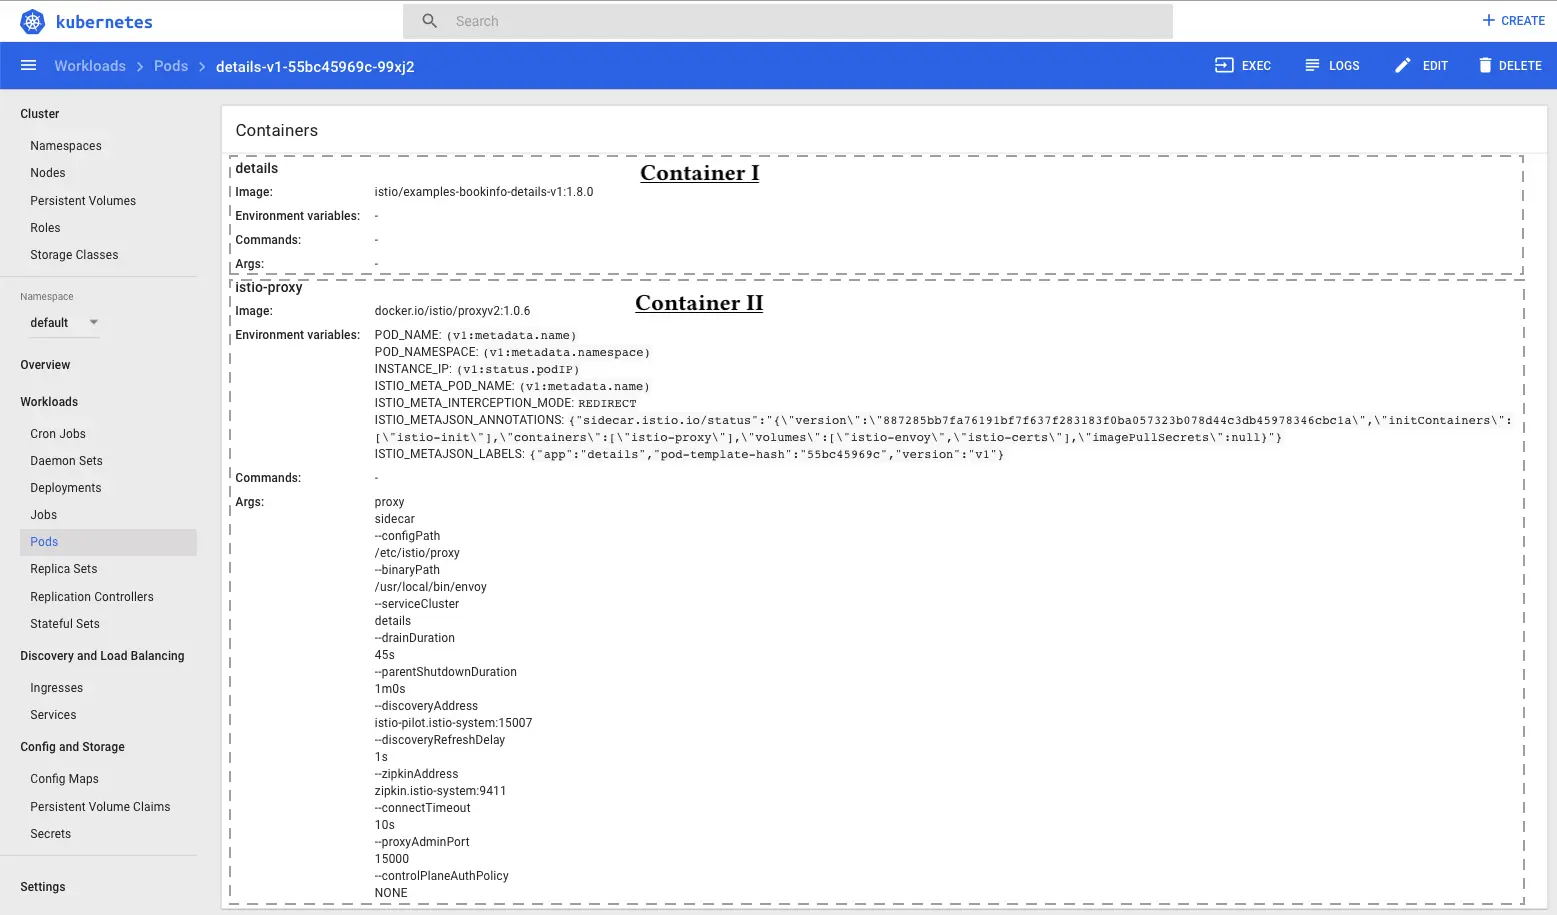
For the sample Deployment of the details-v1 microservice which looks like this:
| |
All the extra paramters and configuration are added via istioctl kube-inject command.
After executing the command:
| |
We can verify that the sidecar is deployed in the same Deployment as the microservice, just type:
| |
We can even see that there are two containers in the details-v1-* pod:
To be sure that everything is ok, we need to verify that the BookInfo services & pods are here:
| |
And :
| |
Now, we can go on to next steps and enjoy the great Istio features :)
Traffic Management
Istio Gateway & VirtualService
Now that the Bookinfo services are up and running, we need to make the Services accessible from outside of your Kubernetes cluster. An Istio Gateway object is used for this purpose.
An Istio Gateway configures a load balancer for HTTP/TCP traffic at the edge of the service mesh and enables Ingress traffic for an application. Unlike Kubernetes Ingress, Istio Gateway only configures the L4-L6 functions (for example, ports to expose, TLS configuration). Users can then use standard Istio rules to control HTTP requests as well as TCP traffic entering a Gateway by binding a VirtualService to it.
We can define the Ingress gateway for the Bookinfo application using the sample gateway configuration:
| |
A VirtualService defines the rules that control how requests for a service are routed within an Istio service mesh. For example, a VirtualService could route requests to different versions of a service or to a completely different service than was requested. Requests can be routed based on the request source and destination, HTTP paths and header fields, and weights associated with individual service versions.
The VirtualService configuration looks like:
| |
Let’s create the Istio Gateway and the VirtualService:
| |
Confirm the gateway has been created:
| |
Let’s export the INGRESS_HOST, the INGRESS_PORT and the GATEWAY_URL:
| |
To test the Gateway:
| |
You must have 200 as response code.
You can also point your browser to http://$GATEWAY_URL/productpage to view the Bookinfo web page. If you refresh the page several times, you should see different versions of reviews shown in productpage, presented in a round robin style (red stars, black stars, no stars), since we haven’t yet used Istio to control the version routing.
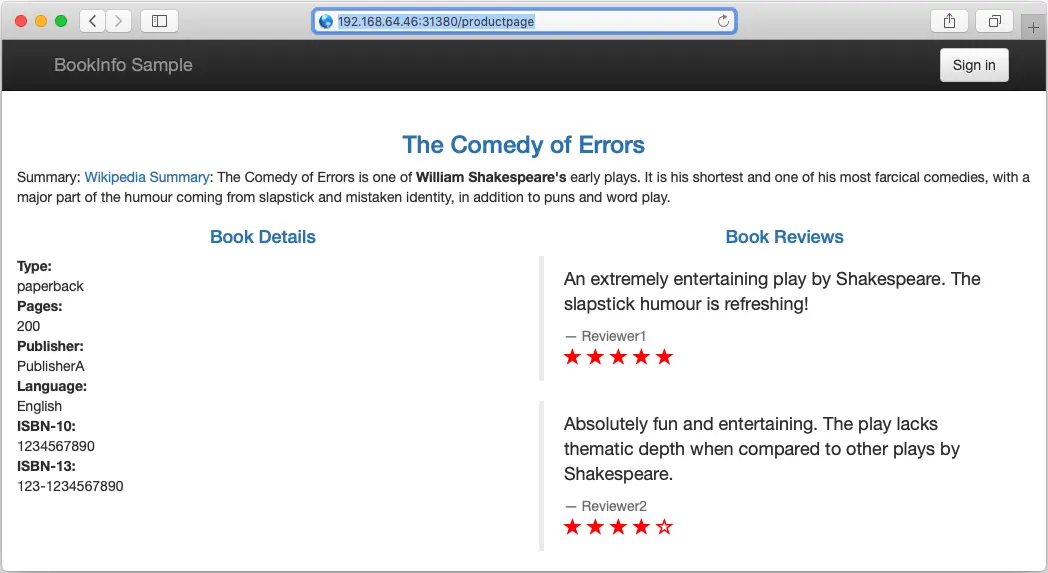
If we refresh the web page some times, we will get different versions of the reviews structure: One version has red stars (the one that we got in the screenshot), an other one that have back stars and a third one without starts. This is due to the availability of three versions of the reviews microservice deployed in our sample BookInfo application.
You can verify the availability of the three versions of the reviews microservice:
| |
We got different versions of reviews structure while refreshing because Istio, by default, dispatches access to loadbalanced services using a Round Robin scheduling. One of the great features of Istio is to route the traffic to some dedicated version of a service, or even using sliced dispatching of requests.
In the next steps, we will see how to route the traffic based on version.
Destination Rules
Before we can use Istio to control the Bookinfo version routing, we need to define the available versions of an application, called subsets. These subsets are defined in an Istio object called DestinationRule/The choice of version to display can be decided based on criteria (headers, URL, etc…) defined to each version. We can enjoy this flexibility of criterias to do Blue-green Deployments, A/B Testing, and Canary Releases.
| |
- The Kubernetes Service name on which we will be routing the traffic
- The
subsetelement name - The
subsetelement version
We will create the default destination rules for the Bookinfo services, using the sample destination-rule-all.yaml:
| |
Run the following command to create default Destination Rules:
| |
Wait a few seconds for the destination rules to propagate.
You can verify that the destination rules are correctly created, using the following command:
| |
Now, we will change the default round-robin behavior for traffic routing: we will route all traffic to reviews-v1, using a new VirtualServices configuration that looks like this:
| |
The BookInfo sample brings a virtual-service-all-v1.yaml that holds the necessary configuration of the new VirtualServices. To deploy it, just type:
| |
You can verify that the review VirtualService is correctly created, using the following command:
| |
Try now to reload the page multiple times, and note how only reviews:v1 is displayed each time:

Next, we will change the route configuration so that all traffic from a specific user is routed to a specific service version. In this case, all traffic from a user named Jason will be routed to the service reviews:v2.
Next, we will be routing traffic for a specific user to a specific service version. In our example, we will be routing all the traffic for a user named jason to the service reviews:v2.
The virtual-service-reviews-test-v2.yaml configuration covers this case:
| |
To deploy it, just type:
| |
You can verify that the review VirtualService is correctly created, using the following command:
| |
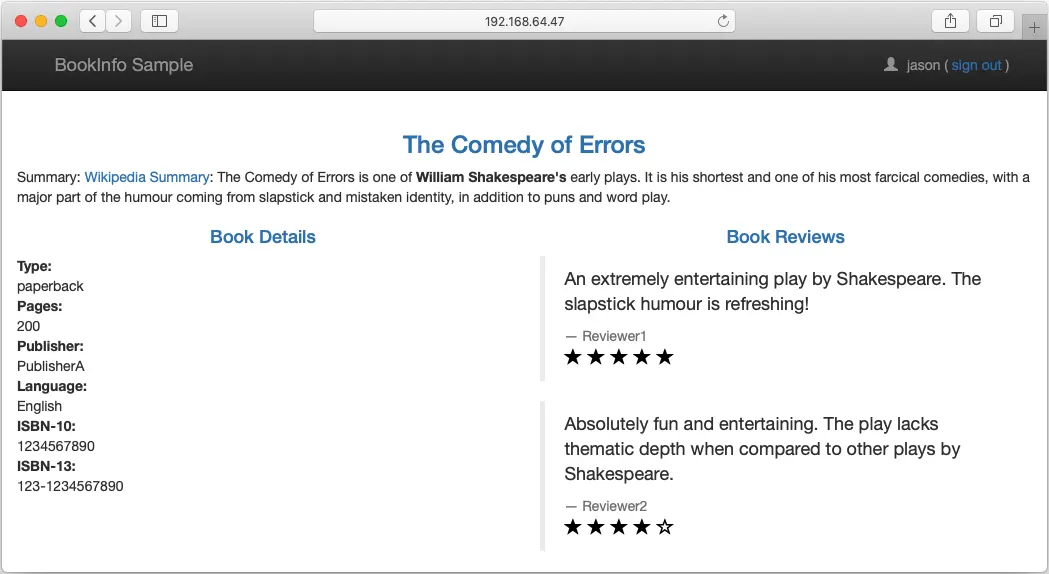
To test the new VirtualService, just click on the Sign button and login using jason as username and any value as password. Now, we will see reviews:v2. If you logout, we will get back the reviews:v1:
Next, we will see how to gradually migrate traffic from one version of a microservice to another one. In our example, we will send 50% of traffic to reviews:v1 and 50% to reviews:v3:
| |
Let’s verify the content of the new VirtualService:
| |
The subset is set to 50% of traffic to the v1 and 50% to the v3:
| |
Try now to reload the page multiple times, you will see diversely reviews:v1 and reviews:v3.
Observability
Distributed Tracing
Hello Jaeger
To access the Jaeger Dashboard, establish port forwarding from local port 16686 to the Tracing instance:
| |
In your browser, go to http://127.0.0.1:16686
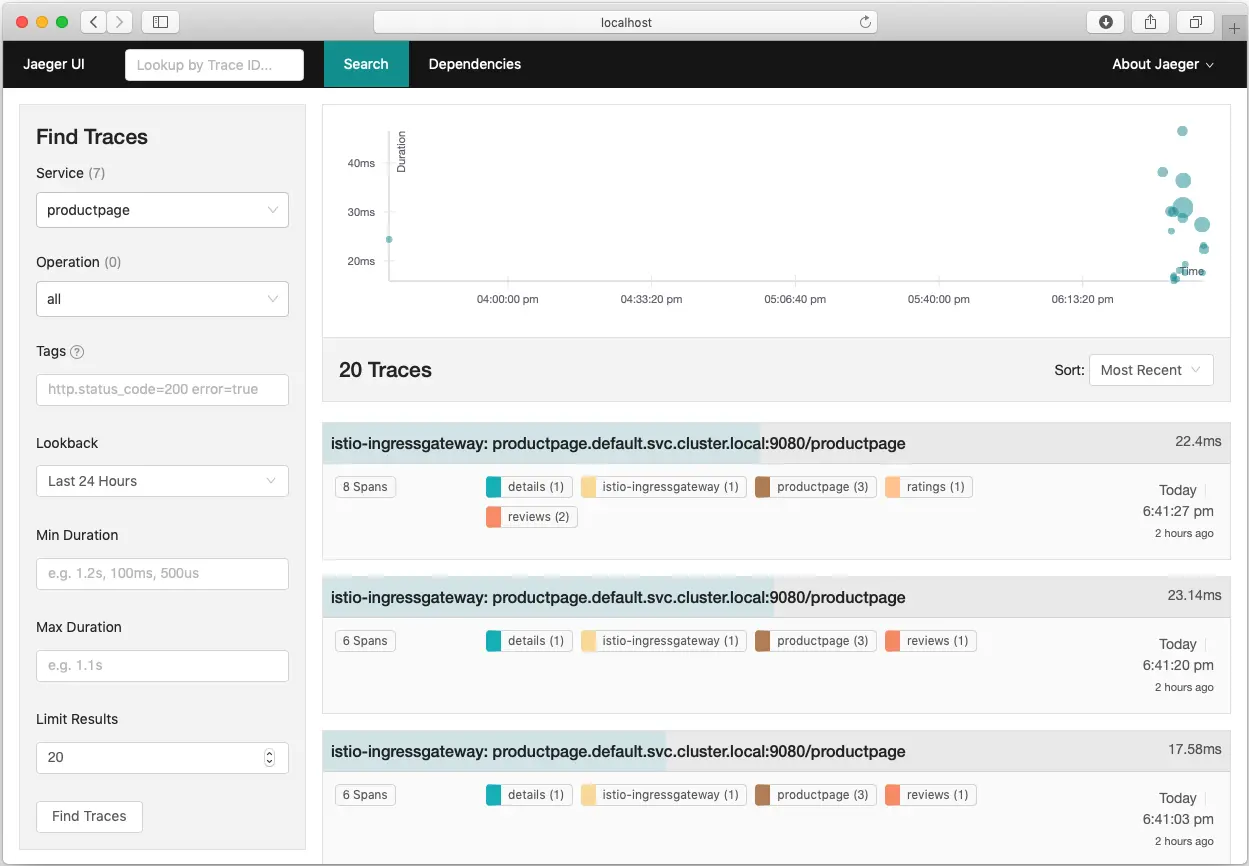
From the Services menu, select productpage service.
Scroll to the bottom and click on Find Traces button to see traces:
If you click on a trace, you should see more details. The page should look something like this:
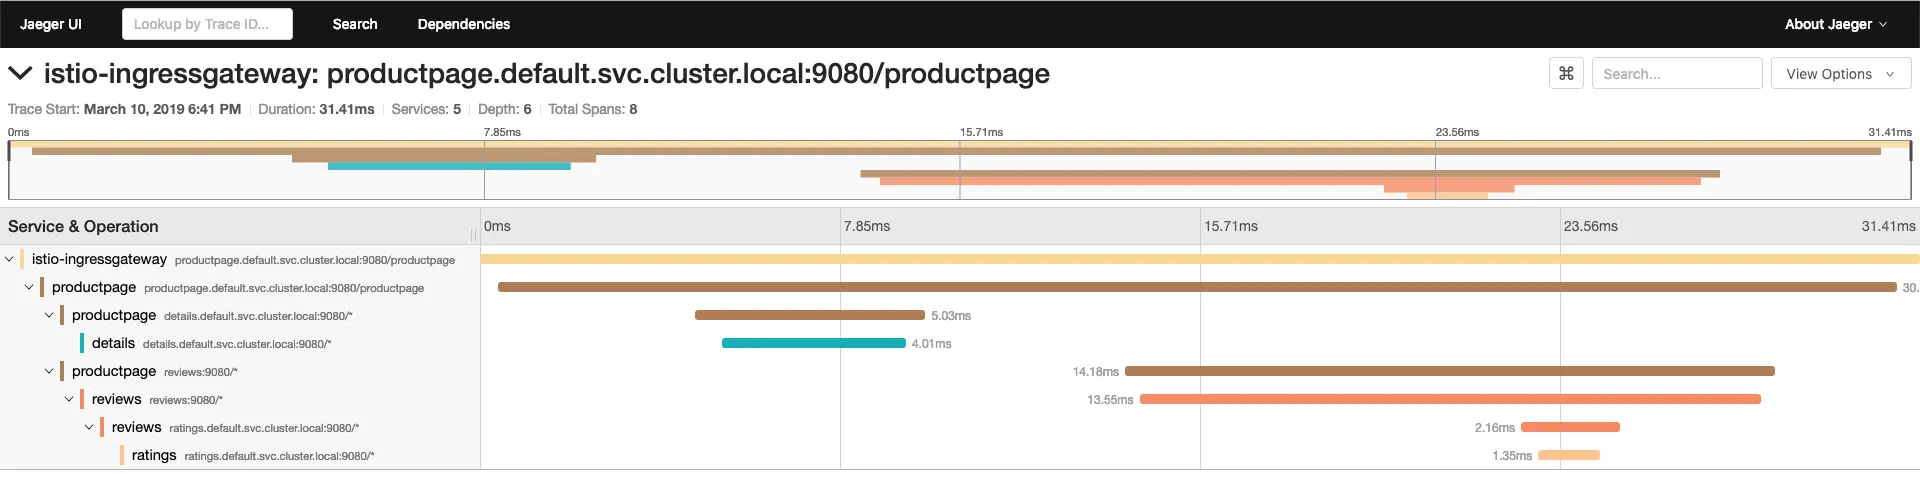
When invoking the /productpage, many BookInfo services are called. These services correspond to spans and the page call itself corresponds to the trace.
Although Istio proxies are able to automatically send spans, they need some hints to tie together the entire trace. Applications need to propagate the appropriate HTTP headers so that when the proxies send span information, the spans can be correlated correctly into a single trace.
To do this, an application needs to collect and propagate the following headers from the incoming request to any outgoing requests:
- x-request-id
- x-b3-traceid
- x-b3-spanid
- x-b3-parentspanid
- x-b3-sampled
- x-b3-flags
- x-ot-span-context
When you make downstream calls in your applications, make sure to include these headers.
Trace sampling
When using the Bookinfo sample application above, every time you access /productpage you see a corresponding trace in the Jaeger dashboard. This sampling rate (which is 100% in the BookInfo example) is suitable for a test or low traffic mesh, which is why it is used as the default for the demo installs.
In other configurations, Istio defaults to generating trace spans for 1 out of every 100 requests (sampling rate of of 1%).
You can control the trace sampling percentage in one of two ways:
In a running mesh, edit the istio-pilot deployment and change the environment variable with the following steps:
- To open your text editor with the deployment configuration file loaded, run the following command:
| |
- Find the
PILOT_TRACE_SAMPLINGenvironment variable, and change the value: to your desired percentage.
In both cases, valid values are from 0.0 to 100.0 with a precision of 0.01.
Grafana
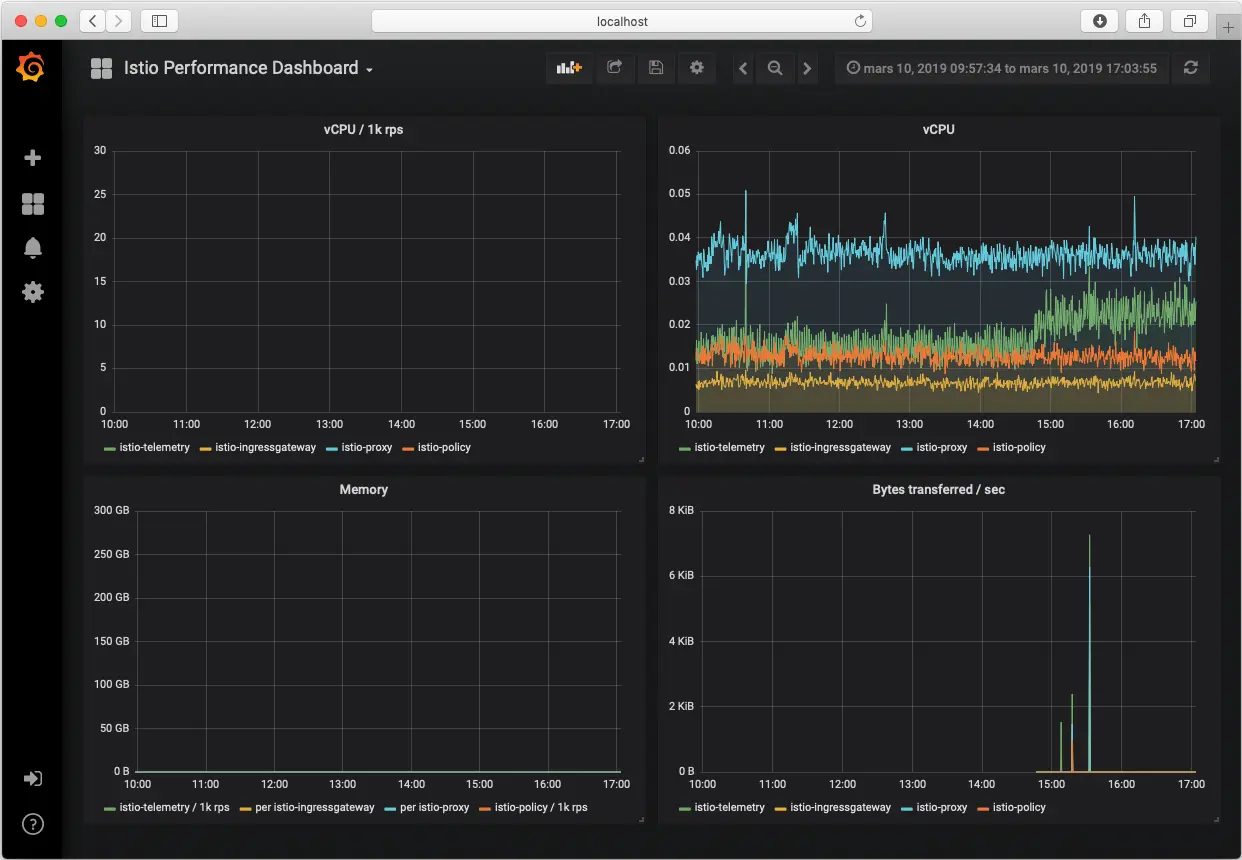
The Grafana add-on in Istio is a preconfigured instance of Grafana. The base image (grafana/grafana:5.0.4) has been modified to start with both a Prometheus data source and the Istio Dashboard installed. The base install files for Istio, and Mixer in particular, ship with a default configuration of global (used for every service) metrics. The Istio Dashboard is built to be used in conjunction with the default Istio metrics configuration and a Prometheus backend.
Establish port forwarding from local port 3000 to the Grafana instance:
| |
Browse to http://localhost:3000 and navigate to the Istio Mesh Dashboard:
Prometheus
Mixer comes with a built-in Prometheus adapter that exposes an endpoint serving generated metric values. The Prometheus add-on is a Prometheus server that comes preconfigured to scrape Mixer endpoints to collect the exposed metrics. It provides a mechanism for persistent storage and querying of Istio metrics.
To access the Prometheus Dashboard, establish port forwarding from local port 9090 to Prometheus instance:
| |
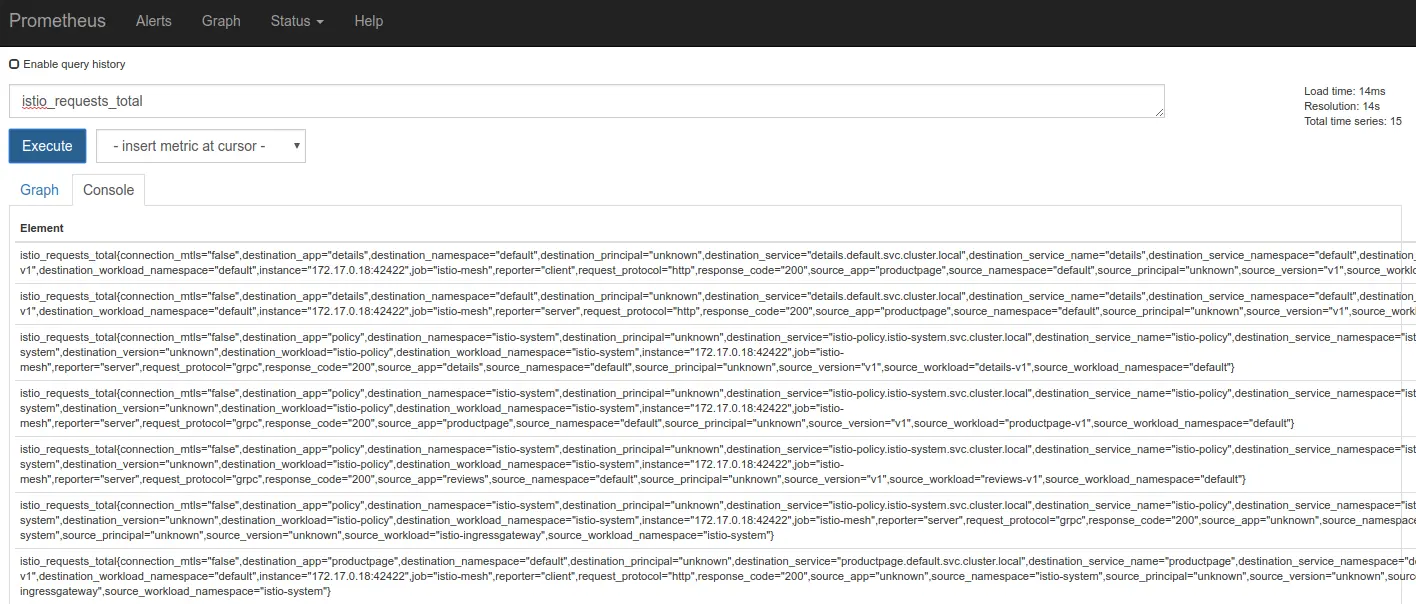
Browse to http://localhost:9090/graph, and in the “Expression” input box, enter: istio_request_byte_count. Click Execute:
Service Graph
The ServiceGraph service provides endpoints for generating and visualizing a graph of services within a mesh. It exposes the following endpoints:
/force/forcegraph.htmlAs explored above, this is an interactive D3.js visualization./dotvizis a static Graphviz visualization./dotgraphprovides a DOT serialization./d3graphprovides a JSON serialization for D3 visualization./graphprovides a generic JSON serialization.
To access the Service Graph Dashboard, establish port forwarding from local port 8088 to Service Graph instance:
| |
Browse to http://localhost:8088/dotviz:
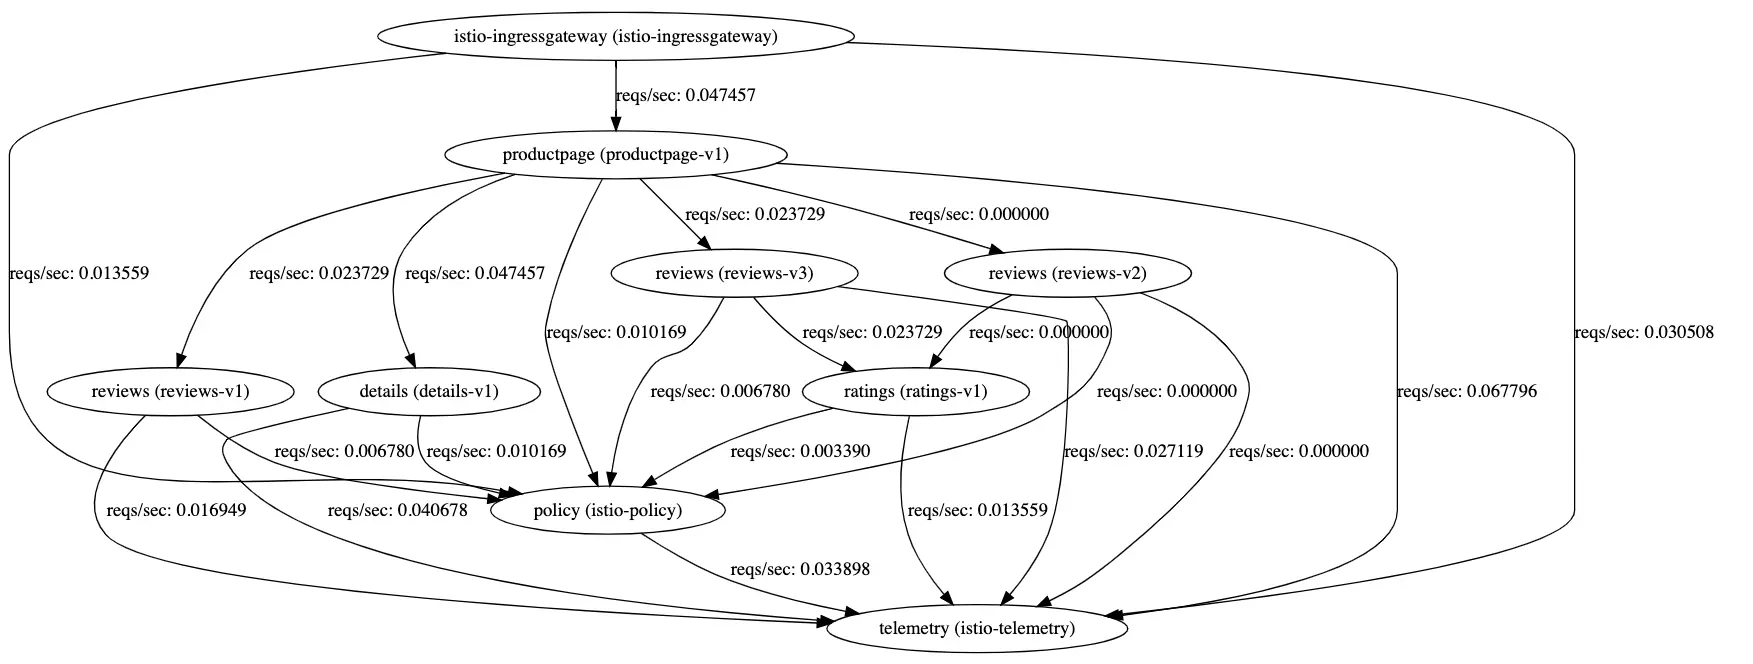
The ServiceGraph example is built on top of Prometheus queries and depends on the standard Istio metric configuration.
Conclusion
That’s all folks! We have been presenting the main concepts and components of Istio Service Mesh. This introducing chapter is just for installation and core concepts of Istio. As we saw in the Traffic Management section, there are infinite scenarios and use cases that you want to cover, like fault injection, controlling Ingress and Egress traffic, circuit breakers, etc..
We did not have the opportunity to cover the Security capabilities of Istio, just because it needs so much chapters to be covered. 😛
Stay tuned, I will be writing some quickies about more great capabilities of Istio ! 😎