In one of the previous posts, I introduced the Azure Functions Java. I felt that I need to write a dedicated tutorial to this great Azure Serverless service 😁
In this post, I will be covering many concepts in deep:
- Triggers and bindings
- Events and messaging
- Deployments & Consumptions
- Monitoring
Generating the hello-world project#
We will scaffold a Java-based Azure Function project using Maven Archetypes, using this command:
1
2
3
4
5
6
7
8
9
| $ mvn archetype:generate -DarchetypeGroupId=com.microsoft.azure \
-DarchetypeArtifactId=azure-functions-archetype \
-DappName=hello-world-app-example \
-DappRegion=FranceCentral \
-DresourceGroup=helloworld-rg \
-DgroupId=com.helloworld.group \
-DartifactId=helloworld-functions \
-Dpackage=com.helloworld \
-DinteractiveMode=false
|
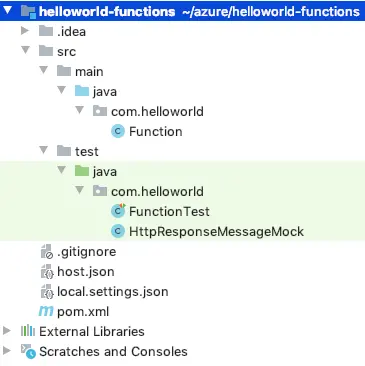
The generated project will look like:
The sample function looks like:
 1
 2
 3
 4
 5
 6
 7
 8
 9
10
11
12
13
14
15
16
17
18
19
20
21
22
23
24
25
26
27
28
29
30
| /**
* Azure Functions with HTTP Trigger.
*/
public class Function {
@FunctionName("HttpTrigger-Java")
public HttpResponseMessage run(
@HttpTrigger(name = "req",
methods = {HttpMethod.GET, HttpMethod.POST},
authLevel = AuthorizationLevel.FUNCTION) HttpRequestMessage<Optional<String>> request,
final ExecutionContext context) {
context.getLogger().info("Java HTTP trigger processed a request.");
// Parse query parameter
String query = request.getQueryParameters().get("name");
String name = request.getBody().orElse(query);
if (name == null) {
return request
.createResponseBuilder(HttpStatus.BAD_REQUEST)
.body("Please pass a name on the query string or in the request body")
.build();
} else {
return request
.createResponseBuilder(HttpStatus.OK)
.body("Hello, " + name)
.build();
}
}
}
|
You can grab the final sample project from GitHub.
We need to create the Function Application on the Azure portal. I already mentioned how to do that on the previous Azure Functions tutorial 🤓
Building the Azure Functions Application#
Before running the project, you need to build it: mvn package This Maven command will do the package-functions operation:
 1
 2
 3
 4
 5
 6
 7
 8
 9
10
11
12
13
14
15
16
17
18
19
20
21
22
23
24
25
26
| [INFO] ...
[INFO] --- azure-functions-maven-plugin:1.3.4:package (package-functions) @ helloworld-functions ---
[INFO]
[INFO] Step 1 of 7: Searching for Azure Functions entry points
[INFO] 1 Azure Functions entry point(s) found.
[INFO]
[INFO] Step 2 of 7: Generating Azure Functions configurations
[INFO] Generation done.
[INFO]
[INFO] Step 3 of 7: Validating generated configurations
[INFO] Validation done.
[INFO]
[INFO] Step 4 of 7: Saving empty host.json
[INFO] Successfully saved to /Users/nebrass/azure/helloworld-functions/target/azure-functions/hello-world-example/host.json
[INFO]
[INFO] Step 5 of 7: Saving configurations to function.json
[INFO] Starting processing function: HttpTrigger-Java
[INFO] Successfully saved to /Users/nebrass/azure/helloworld-functions/target/azure-functions/hello-world-example/HttpTrigger-Java/function.json
[INFO]
[INFO] Step 6 of 7: Copying JARs to staging directory/Users/nebrass/azure/helloworld-functions/target/azure-functions/hello-world-example
[INFO] Using 'UTF-8' encoding to copy filtered resources.
[INFO] Copying 1 resource to /Users/nebrass/azure/helloworld-functions/target/azure-functions/hello-world-example
[INFO] Copied successfully.
[INFO] Step 7 of 7: Installing function extensions if needed
[INFO] Extension bundle specified, skip install extension
[INFO] Successfully built Azure Functions.
|
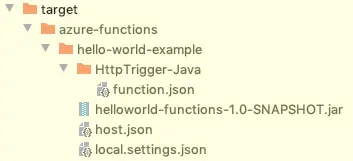
This command will create an azure-functions folder under the Maven target folder:
In the Function.java class, shown in the sample code above, we have a function called HttpTrigger-Java, this is why we got a folder with the same name, with a function definition file called function.json file:
 1
 2
 3
 4
 5
 6
 7
 8
 9
10
11
12
13
14
| {
"scriptFile" : "../helloworld-functions-1.0-SNAPSHOT.jar",
"entryPoint" : "com.helloworld.Function.run",
"bindings" : [ {
"type" : "httpTrigger",
"direction" : "in",
"name" : "req",
"methods" : [ "GET", "POST" ]
}, {
"type" : "http",
"direction" : "out",
"name" : "$return"
} ]
}
|
- The
scriptFile is pointing on the packaged application JAR file. - the
entryPoint is pointing on the run method of the Function class; where the Azure Function is defined. - The first element in the
bindings array is the HTTP Trigger. The type and direction properties identify the trigger. The name property identifies the function parameter that receives the request content. The methods array will list the HTTP verbs that are identifying the HTTP Request. The second element in the bindings array is the HTTP output binding. The type and direction properties identify the binding. The name property specifies how the function provides the response, in this case by using the function return value. This means, when we do a return "Hello World"; this String will be emitted as an HTTP Response.
Running & deploying the Azure Functions Application#
To run the project locally just do: mvn azure-functions:run
To deploy the project to your Azure Subscription: mvn azure-functions:deploy
The azure-functions:deploy command needs that your Azure CLI have to be authenticated to your subscription 🤓
Triggers and bindings#
Triggers are what cause a function to run. A trigger defines how a function is invoked and a function must have exactly one trigger. Triggers have associated data, which is often provided as the payload of the function.
Binding to a function is a way of declaratively connecting another resource to the function; bindings may be connected as input bindings, output bindings, or both. Data from bindings is provided to the function as parameters.
We can mix and match different bindings to suit your needs. Bindings are optional and a function might have one or multiple input and/or output bindings.
With Triggers and bindings, we can avoid hardcoding access to other services. Our function receives data (for example, the content of a queue message) in function parameters. We send data (for example, to create a queue message) by using the return value of the function.
How works the triggers and Bindings ? 🤔#
I found a great animated GIF in the Azure Functions documentation that describes how Triggers and Bindings work ?

In Azure Functions, bindings are available as separate packages from the functions runtime. Extension bundles allow other functions access to all bindings through a configuration setting. HTTP and timer triggers are supported by default and don’t require an extension.
Extension bundles for local development#
Extension bundles is a local development technology that helps us to add a compatible set of Functions binding extensions to our Azure Functions project.
When used, these extension packages will be included in the deployment package when we deploy it to Azure. To avoid conflicts between packages, the Bundles guarantee that the packaged extension inside are compatible with each other.
To develop Azure Functions application locally, we need to have the latest version of Azure Functions Core Tools, which provide a local development experience for creating, developing, testing, running, and debugging Azure Functions locally.
The host.json file included in the generated project skull enables the Extension Bundle:
1
2
3
4
5
6
7
| {
"version": "2.0",
"extensionBundle": {
"id": "Microsoft.Azure.Functions.ExtensionBundle",
"version": "[1.*, 2.0.0)"
}
}
|
This Extension Bundle includes these extensions:
 1
 2
 3
 4
 5
 6
 7
 8
 9
10
11
12
13
14
15
16
17
18
19
20
21
22
23
24
25
26
27
28
29
30
31
32
33
34
35
36
37
38
| [
{
"id": "Microsoft.Azure.WebJobs.Extensions.Storage",
"version": "3.0.4"
},
{
"id": "Microsoft.Azure.WebJobs.Extensions.ServiceBus",
"version": "3.0.3"
},
{
"id": "Microsoft.Azure.WebJobs.Extensions.EventHubs",
"version": "3.0.3"
},
{
"id": "Microsoft.Azure.WebJobs.Extensions.SendGrid",
"version": "3.0.0"
},
{
"id": "Microsoft.Azure.WebJobs.Extensions.DurableTask",
"version": "1.8.3"
},
{
"id": "Microsoft.Azure.WebJobs.Extensions.EventGrid",
"version": "2.0.0"
},
{
"id": "Microsoft.Azure.WebJobs.Extensions.CosmosDB",
"version": "3.0.3"
},
{
"id": "Microsoft.Azure.WebJobs.Extensions.Twilio",
"version": "3.0.0"
},
{
"id": "Microsoft.Azure.WebJobs.Extensions.SignalRService",
"version": "1.0.0"
}
]
|
Great ! Now, we saw how things work and what is the idea behind the Azure Functions?
Now, we will discuss our demo scenario.
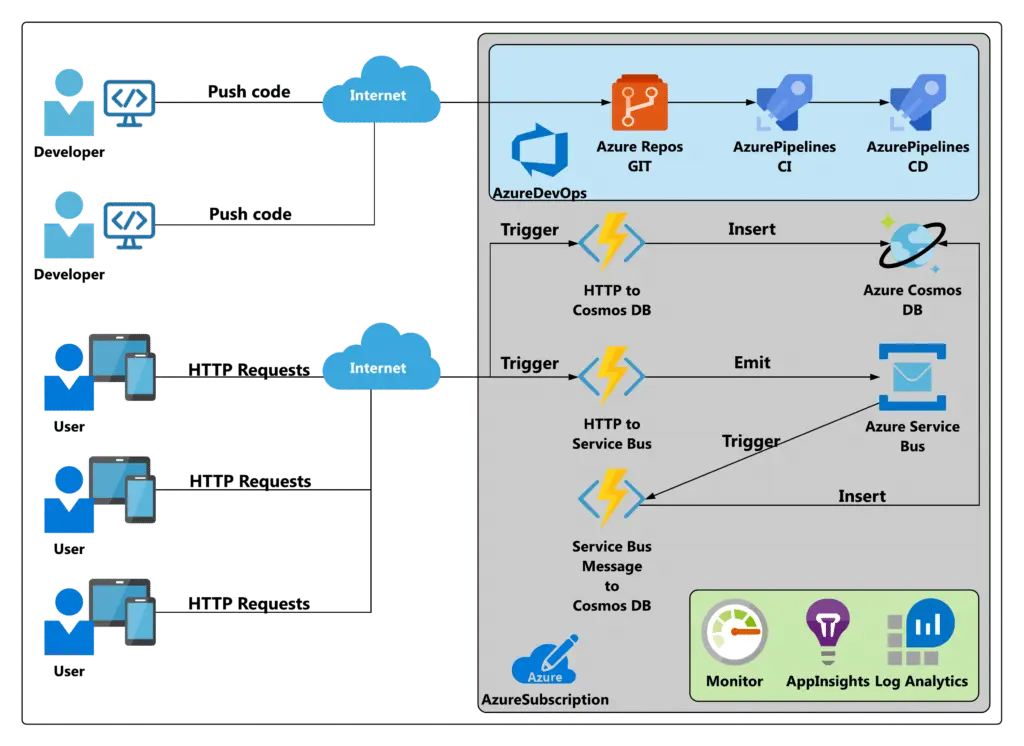
The demo scenario#
In our demo will be dealing with Azure Functions that are dealing with Cosmos DB and Service Bus.
For development cycles, we will be based on Azure DevOps as mentioned in this post.
In the next steps, we will create:
- a Cosmos DB account
- a Storage account
- a Service Bus namespace
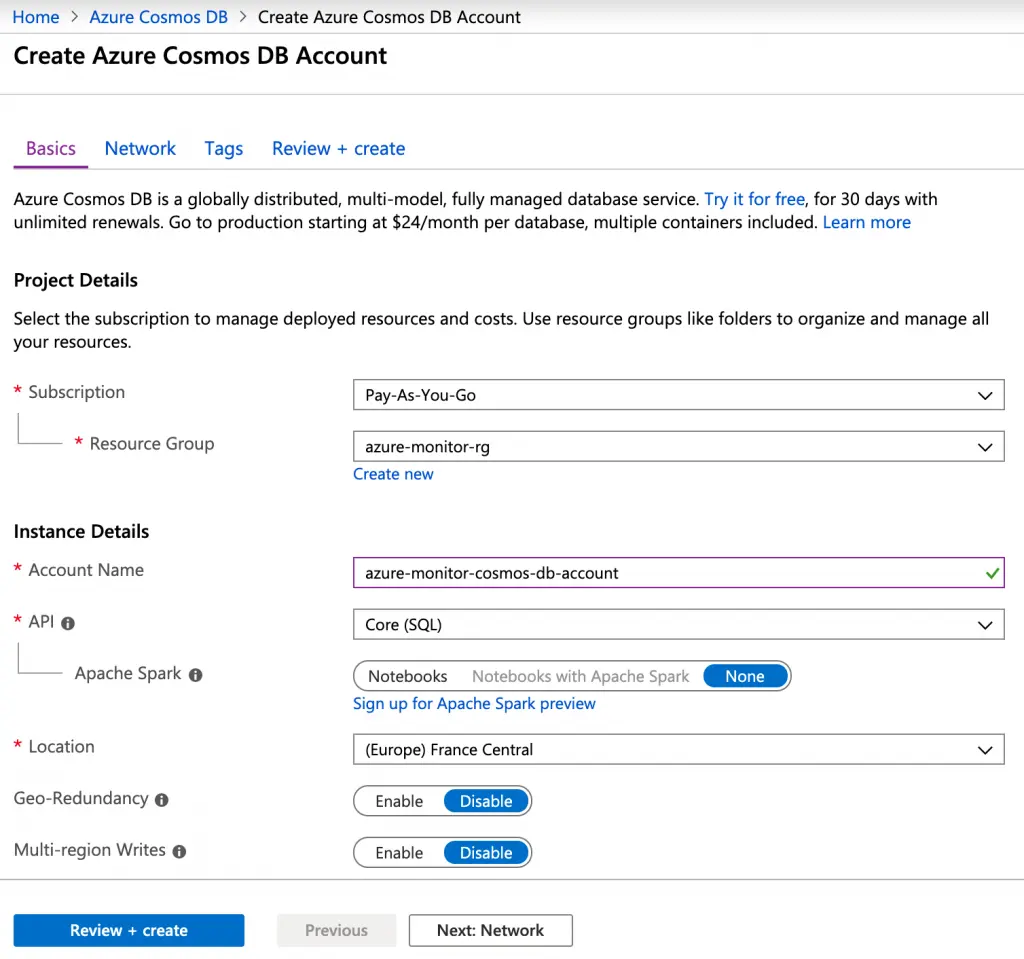
Create Azure Cosmos DB Account#
We need to create a CosmosDB account:
Click on Review + create and confirm the creation.
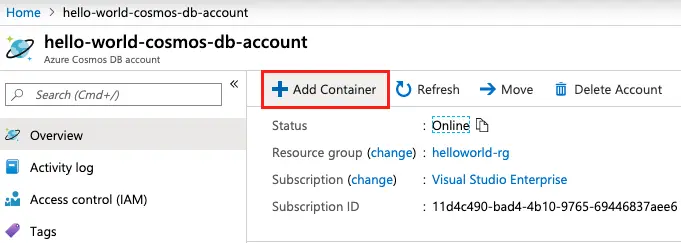
After creating the CosmosDB account, we need to create our Database and our Container (some thing like the SQL Table 😁 )
To do that, we need to go to the Overview section of the recently Cosmos DB Account, and click Add Container:
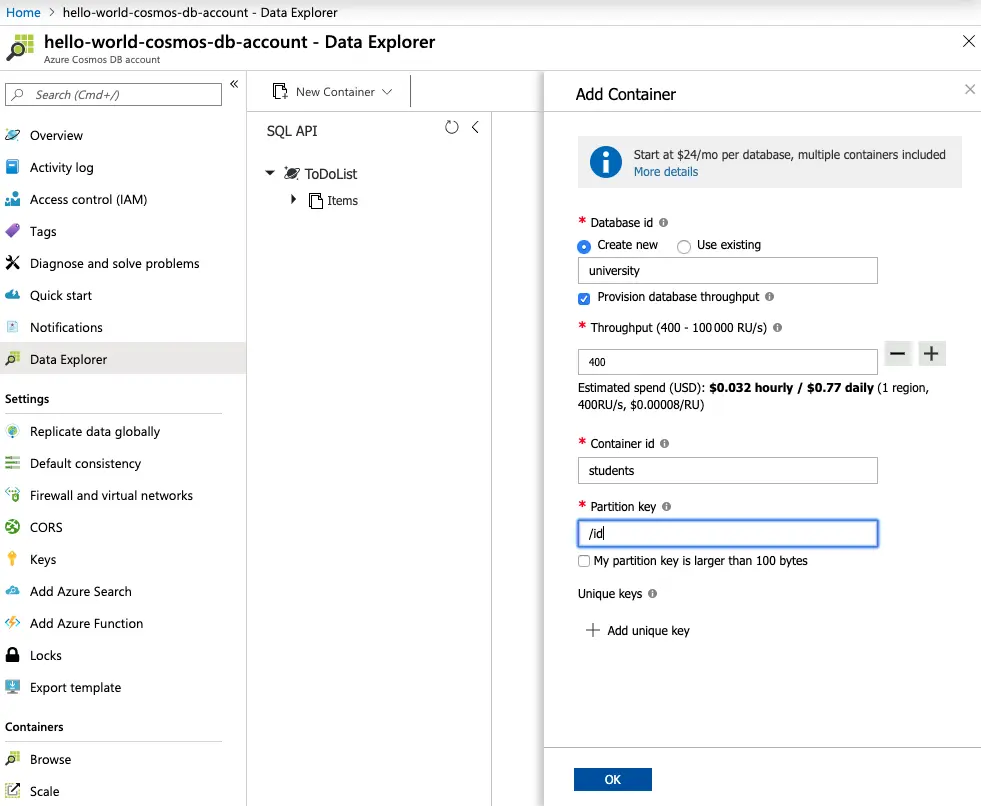
Next, fill the creation form :
- Database id: university
- Container id: students
- Partition key: /id
Now, we need to plug the Cosmos DB connection to our application.
First of all, we need to get the Cosmos DB Connection Key and next we will plug it in two locations:
- in the Azure Function Application portal
- in the local development project
Okey 😁 let’s do that !
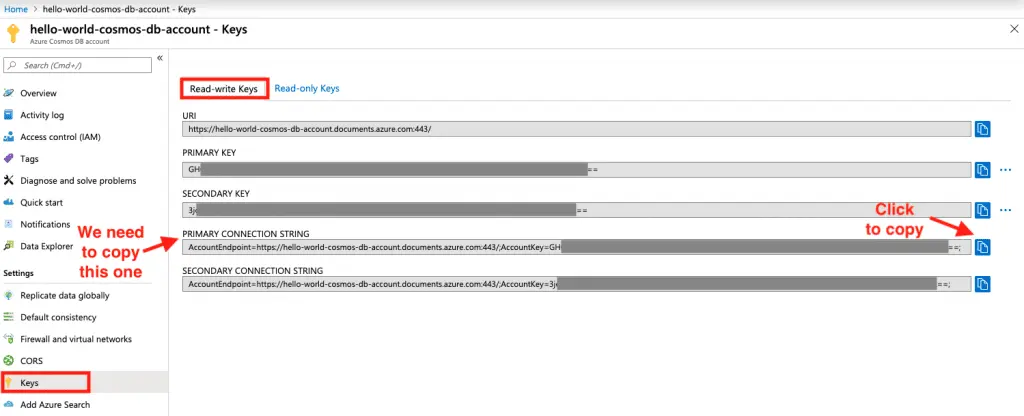
getting the Cosmos DB Connection key#
First of all, we need to go to the Keys menu, next choose the Read-write Keys section and copy the Primary Connection String, this property will be used in the Azure Function Application to access the Cosmos DB:
Next, we will use this connection key in the next steps..
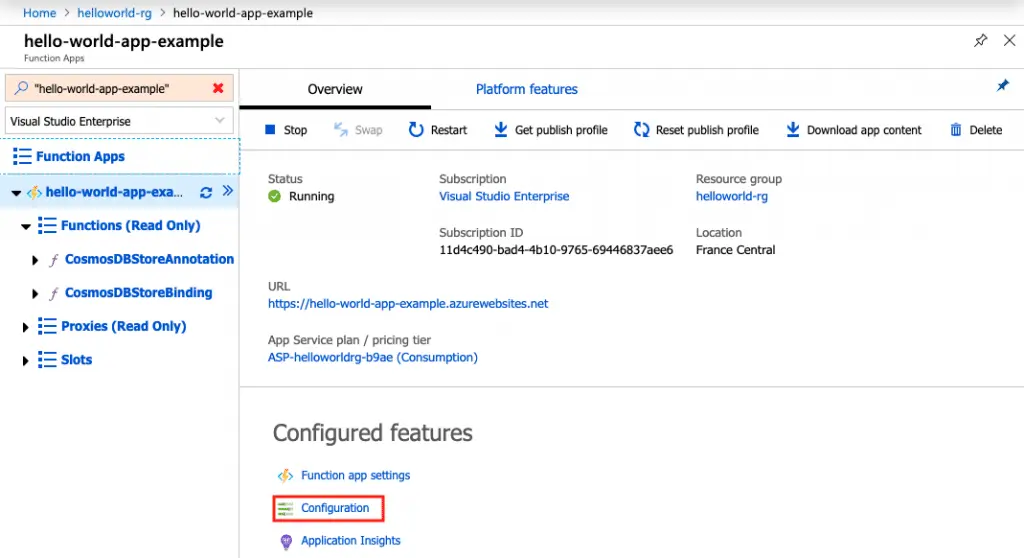
1) Plug the connection Key to the Azure Function Application portal#
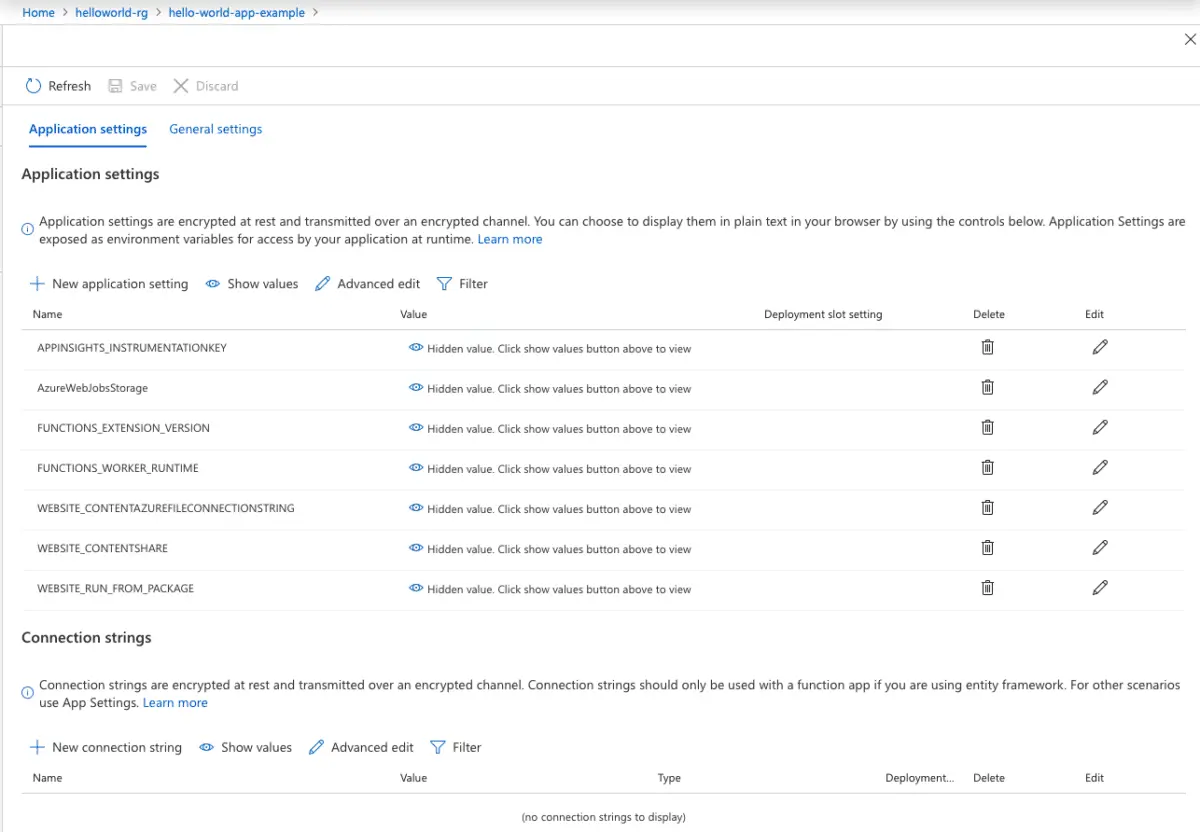
To plug the Connection Key to the Azure Function Application, we need to go to our Azure Function dashboard, and click on the Configuration menu:
Next, we will access the Configuration listing:
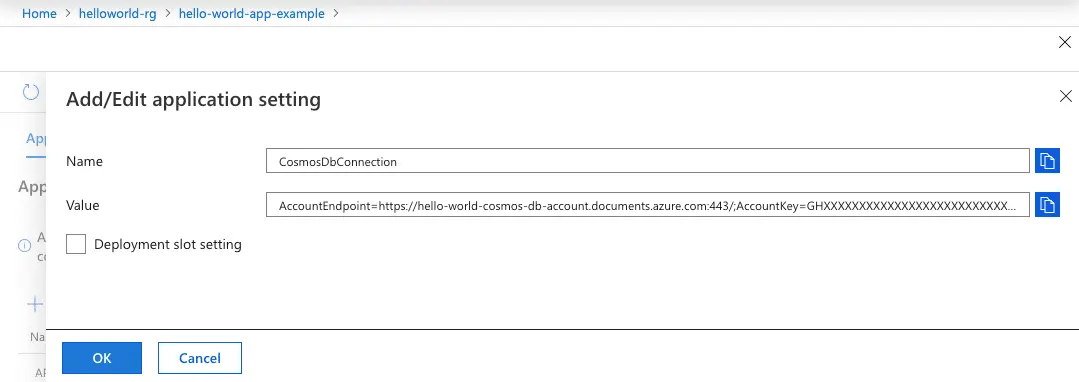
Now, click on the New application setting and paste the Connection Key to the form :
After filling the form and validating the creation, you will be back to the Configuration listing, you need to click on Save to confirm the creation.
2) Plug the connection Key to the local development project#
We will go back to the source code project. We will add this Connection Key to the l_ocal.settings.json_ file. The file will look like:
1
2
3
4
5
6
7
8
| {
"IsEncrypted": false,
"Values": {
"AzureWebJobsStorage": "",
"CosmosDbConnection": "AccountEndpoint=https://hello-world-cosmos-db-account.documents.azure.com:443/;AccountKey=GHXXXXXXXXXXXXXXXXXXXXXXXXXXXXXXXXXXXXXXXXXXXX==;",
"FUNCTIONS_WORKER_RUNTIME": "java"
}
}
|
That’s all for the Cosmos DB configuration part ! 😁
As you see, we have already an AzureWebJobsStorage entry that did not have a value, but in the Configuration listing we have already this entry in the Application Settings; just click on the Show values button to show the values. Next, we need to copy this value and past it into the l_ocal.settings.json_ file:
1
2
3
4
5
6
7
8
| {
"IsEncrypted": false,
"Values": {
"AzureWebJobsStorage": "DefaultEndpointsProtocol=https;AccountName=helloworldexamplestorage;AccountKey=vs3aXXXXXXXXXXXXXXXXXXXXXXXXXXXXXXXXXXXXXXXXXXXX==;EndpointSuffix=core.windows.net",
"CosmosDbConnection": "AccountEndpoint=https://hello-world-cosmos-db-account.documents.azure.com:443/;AccountKey=GHXXXXXXXXXXXXXXXXXXXXXXXXXXXXXXXXXXXXXXXXXXXX==;",
"FUNCTIONS_WORKER_RUNTIME": "java"
}
}
|
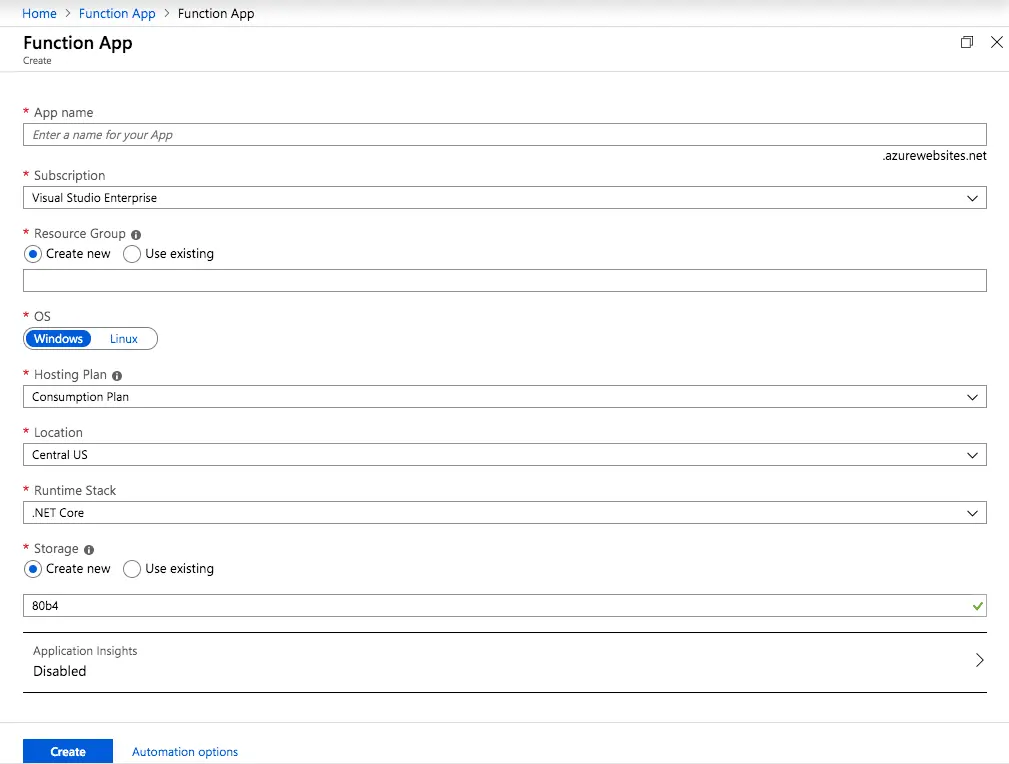
Great ! But from where comes this value? Why it did come automatically ?
If you go back and look to the Azure Function creation form, you will notice that there already a Storage creation element in the form:
So the AzureWebJobsStorage entry comes from the create Azure Storage account.
Now, we need to move to creating the Azure Service Bus namespace 😎
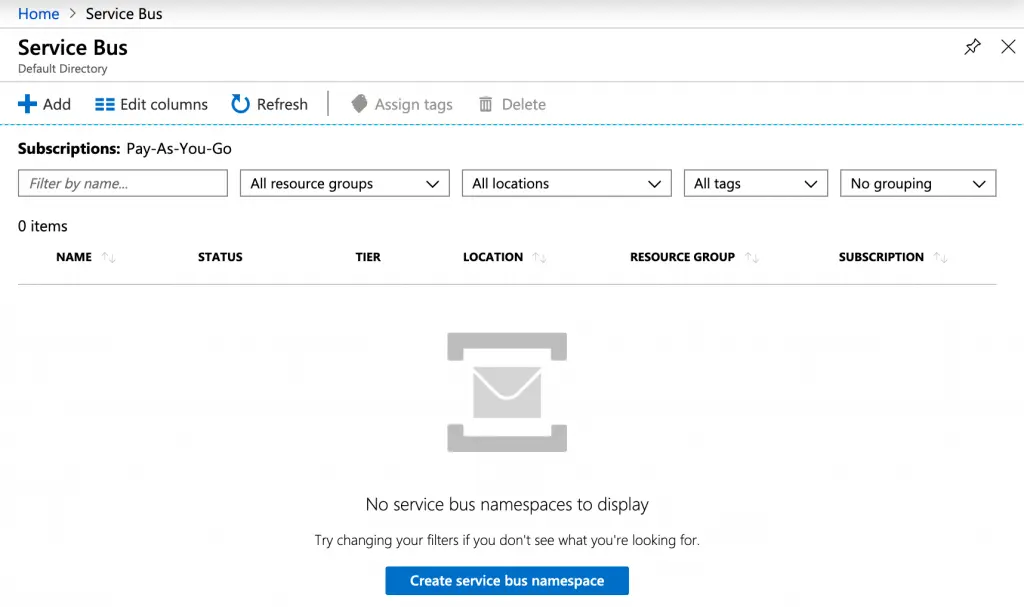
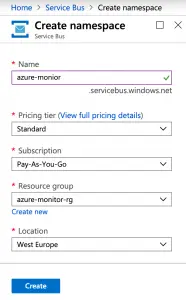
Create Azure Service bus namespace#
We need to create a new Azure Service Bus namespace:
Click on Add or Create namespace to go to the creation form:
Click on Create and confirm the creation.
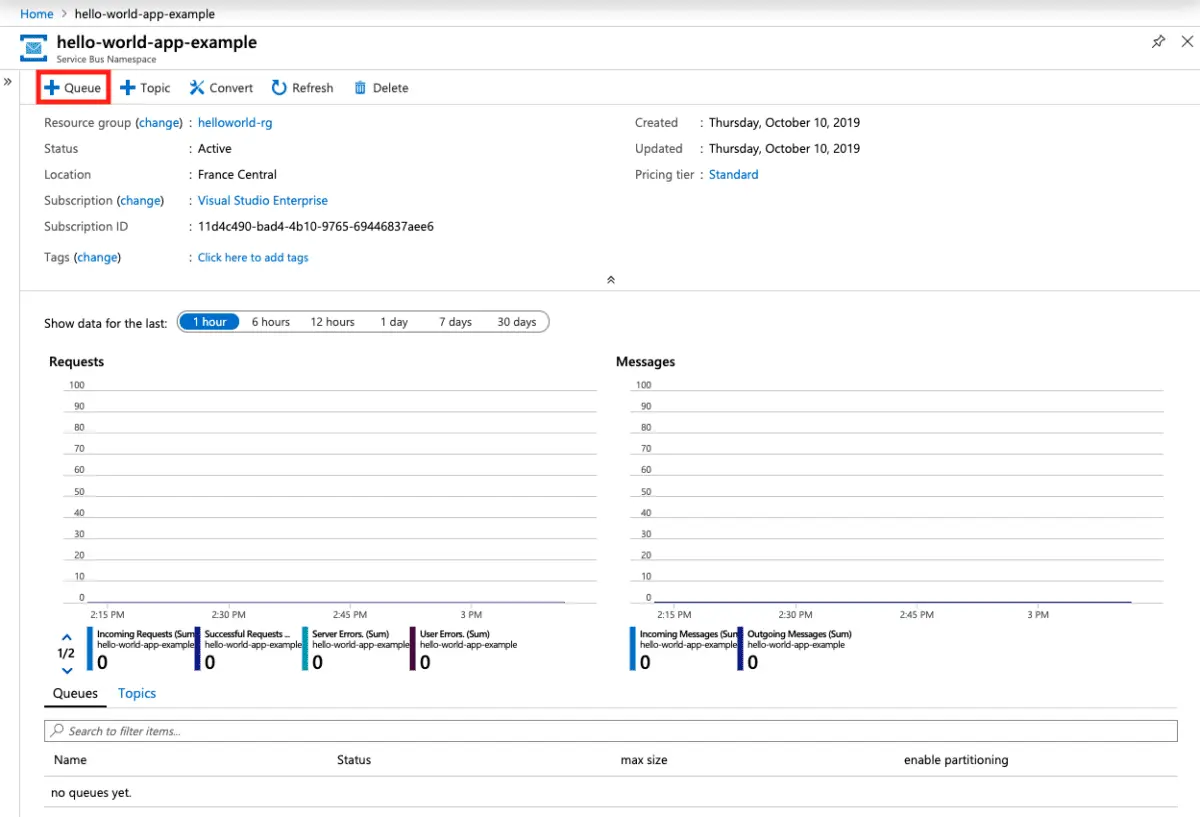
Next, we will create a Queue on which we will be sending some messages. To do that, we need to click on + Queue:
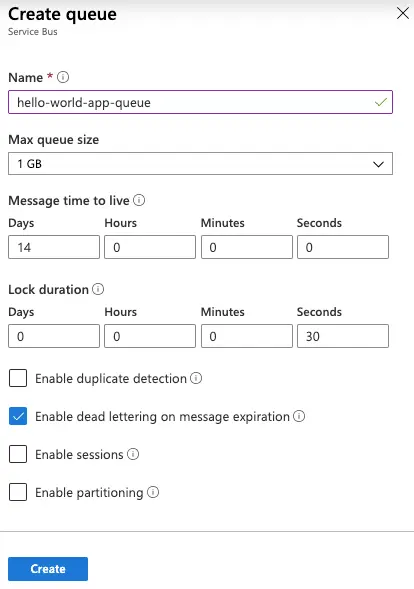
The Queue creation form:
- Name: hello-world-app-queue
- Max queue size: 1 GB
- Time To Live: 14 Days
- We need to enable:
- Enable dead lettering on message expiration ℹ️ Dead lettering messages involves holding messages that cannot be successfully delivered to any receiver to a separate queue after they have expired. Messages do not expire in the dead letter queue, and it supports peek-lock delivery and all transactional operations.
A dedicated tutorial about sessions will come soon 😎 ℹ️ Service bus sessions allow ordered handling of unbounded sequences of related messages. With sessions enabled a queue can guarantee first-in-first-out delivery of messages.
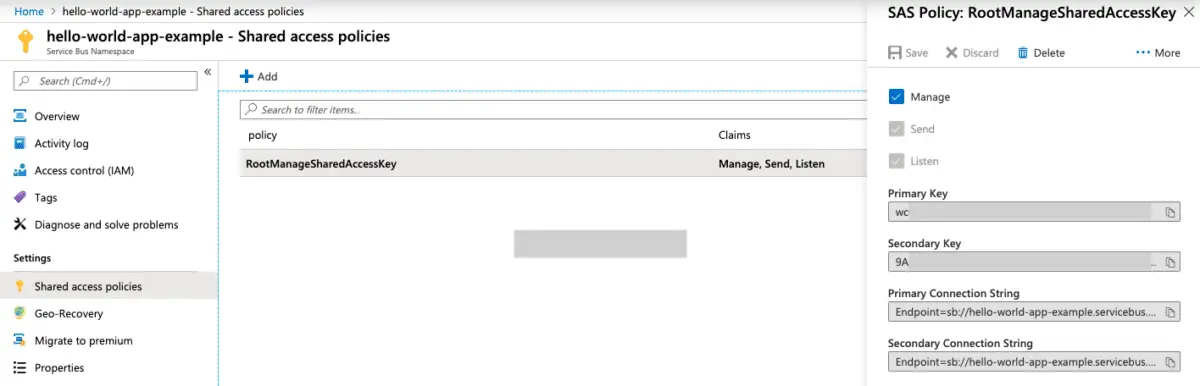
Now, we need to connect our Azure Functions with the Service Bus. To do that, we will do as we did with the Cosmos DB and the Storage Account: on the Service Bus Namespace dashboard, we need to go to the Shared access policies. Next, double click on the RootManageSharedAccessKey policy to show the keys window.
In this window, just click on the Copy button of the Primary Connection String.
Next, go back to the Configuration listing menu of our Azure Functions Application. We will add the Connection String as a setting called ServiceBusConnection:
Next, we will need to add this same setting to our local.settings.json:
1
2
3
4
5
6
7
8
9
| {
"IsEncrypted": false,
"Values": {
"AzureWebJobsStorage": "DefaultEndpointsProtocol=https;AccountName=helloworldexamplestorage;AccountKey=vsXXXXXXXXXXXXXXXXXXXX==;EndpointSuffix=core.windows.net",
"CosmosDbConnection": "AccountEndpoint=https://hello-world-cosmos-db-account.documents.azure.com:443/;AccountKey=GHXXXXXXXXXXXXXXXXXXXX==;",
"ServiceBusConnection": "Endpoint=sb://hello-world-app-example.servicebus.windows.net/;SharedAccessKeyName=RootManageSharedAccessKey;SharedAccessKey=wc0XXXXXXXXXXXXXXXXXXXX=",
"FUNCTIONS_WORKER_RUNTIME": "java"
}
}
|
Perfect ! Let’s go back to do some Java 😁
If we look again to our scenario diagram, we need to write 3 functions:
- HTTP to Cosmos DB function
- HTTP to Service Bus function
- Service Bus Message to Cosmos DB function
In our sample project, we will be inserting a Student record into Cosmos DB and we will be pushing a Student message to Service Bus.
The Student class will look like:
 1
 2
 3
 4
 5
 6
 7
 8
 9
10
11
12
13
14
15
16
17
18
19
20
21
22
23
24
25
26
27
28
29
30
31
32
33
34
35
36
37
38
39
40
41
| public class Student {
private String id;
private String name;
private String email;
public Student(String id, String name, String email) {
this.id = id;
this.name = name;
this.email = email;
}
public String getId() {
return id;
}
public void setId(String id) {
this.id = id;
}
public String getName() {
return name;
}
public void setName(String name) {
this.name = name;
}
public String getEmail() {
return email;
}
public void setEmail(String email) {
this.email = email;
}
@Override
public String toString() {
return "{\"id\":\"" + id +
"\", \"name\":\"" + name + "\", \"email\":\"" + email + "\"}";
}
}
|
HTTP to Cosmos DB function#
This function will have as input a Name and Email address, requested using the HTTP Post verb. After parsing the request payload, this function will create a record of a Student in Cosmos DB.
The sample HTTP Hello World Function shown in the beginning of this tutorial, will be a good starting point:
 1
 2
 3
 4
 5
 6
 7
 8
 9
10
11
12
13
14
15
16
17
18
19
20
21
22
23
24
25
26
27
28
29
30
| /**
* Azure Functions with HTTP Trigger.
*/
public class Function {
@FunctionName("HttpTrigger-Java")
public HttpResponseMessage run(
@HttpTrigger(name = "req",
methods = {HttpMethod.GET, HttpMethod.POST},
authLevel = AuthorizationLevel.FUNCTION) HttpRequestMessage<Optional<String>> request,
final ExecutionContext context) {
context.getLogger().info("Java HTTP trigger processed a request.");
// Parse query parameter
String query = request.getQueryParameters().get("name");
String name = request.getBody().orElse(query);
if (name == null) {
return request
.createResponseBuilder(HttpStatus.BAD_REQUEST)
.body("Please pass a name on the query string or in the request body")
.build();
} else {
return request
.createResponseBuilder(HttpStatus.OK)
.body("Hello, " + name)
.build();
}
}
}
|
In the run() method, we will add an other parameter: the Cosmos DB Binding 😁 the Azure Functions connector to Cosmos DB 🤓
 1
 2
 3
 4
 5
 6
 7
 8
 9
10
11
12
13
14
15
16
| @FunctionName("CosmosDBStoreBinding")
public HttpResponseMessage run(
@HttpTrigger(
name = "req",
methods = {HttpMethod.POST}, 1️⃣
authLevel = AuthorizationLevel.FUNCTION)
HttpRequestMessage<Optional<String>> request,
@CosmosDBOutput(
name = "database",
databaseName = "university",
collectionName = "students",
connectionStringSetting = "CosmosDbConnection") 2️⃣
OutputBinding<String> outputItem,
final ExecutionContext context) {
...
}
|
1️⃣ I only kept the HTTP Post verb - I don’t want that the function get called using the HTTP Get verb.
2️⃣ Here we are defining an OutputBinding parameter, that will hold the computing result to Cosmos DB. That’s why this parameter is annotated using the @CosmosDBOutput.
The @CosmosDBOutput annotation has these main attributes:
- name: The variable name used in function.json 👉 Here we will use “database”
- databaseName: Defines the database name of the CosmosDB to which to write 👉 Here we will use “university”
- collectionName: Defines the collection name of the CosmosDB to which to write 👉 Here we will use “students”
- connectionStringSetting: Defines the app setting name that contains the CosmosDB connection string- This is the same attribute that we already defined in the local.settings.json and also in the Configuration section of the Azure Function in the Azure Subscription 👉 Here we will use “CosmosDbConnection”
Next, in the method body, we will proceed to
- extract the request parameters
- create a Student record
- convert the record to JSON
- set its value to the OutputBinding
- make an HTTP Response to the caller
The complete method will look like:
 1
 2
 3
 4
 5
 6
 7
 8
 9
10
11
12
13
14
15
16
17
18
19
20
21
22
23
24
25
26
27
28
29
30
31
32
33
34
35
36
37
38
39
40
41
| @FunctionName("CosmosDBStoreBinding")
public HttpResponseMessage run(
@HttpTrigger(
name = "req",
methods = {HttpMethod.POST},
authLevel = AuthorizationLevel.FUNCTION) HttpRequestMessage<Optional<String>> request,
@CosmosDBOutput(
name = "database",
databaseName = "university",
collectionName = "students",
connectionStringSetting = "CosmosDbConnection")
OutputBinding<String> outputItem,
final ExecutionContext context) {
context.getLogger().info("Java HTTP trigger processed a request.");
String name = "empty";
String email = "empty";
// Parse query parameter
if (request.getBody().isPresent()) {
JSONObject jsonObject = new JSONObject(request.getBody().get());
name = jsonObject.getString("name");
email = jsonObject.getString("email");
}
// Generate random ID
final String id = String.valueOf(Math.abs(new Random().nextInt()));
// Generate document
Student student = new Student(id, name, email);
final String database = JSONWriter.valueToString(student);
context.getLogger().info(String.format("Document to be saved in DB: %s", database));
outputItem.setValue(database);
// return the document to calling client.
return request.createResponseBuilder(HttpStatus.OK)
.body(database)
.build();
}
|
Here, we used the Bindings explicitly, we can do the same thing, just by annotating the Function itself using the @OutputBinding - as we will not have an OutputBinding object to assign the value to it; we will have to return the value that we want to insert into Cosmos DB as a return value of run() method. The function can be written like this:
 1
 2
 3
 4
 5
 6
 7
 8
 9
10
11
12
13
14
15
16
17
18
19
20
21
22
23
24
25
26
27
28
29
30
31
32
33
34
35
| @FunctionName("CosmosDBStoreAnnotation")
@CosmosDBOutput(
name = "database",
databaseName = "university",
collectionName = "students",
connectionStringSetting = "CosmosDbConnection")
public String run(
@HttpTrigger(
name = "req",
methods = {HttpMethod.POST},
authLevel = AuthorizationLevel.FUNCTION) HttpRequestMessage<Optional<String>> request,
final ExecutionContext context) {
context.getLogger().info("Java HTTP trigger processed a request.");
String name = "empty";
String email = "empty";
// Parse query parameter
if (request.getBody().isPresent()) {
JSONObject jsonObject = new JSONObject(request.getBody().get());
name = jsonObject.getString("name");
email = jsonObject.getString("email");
}
// Generate random ID
final String id = String.valueOf(Math.abs(new Random().nextInt()));
// Generate document
Student student = new Student(id, name, email);
final String database = new JSONObject(student).toString();
context.getLogger().info(String.format("Document to be saved in DB: %s", database));
return database;
}
|
These two possible formats of the function will give the same result - just in the second one, we will not be able to define the HTTP Response to the caller client.
⚠️⚠️ At this level, the insertion in the Cosmos DB is not effective yet; at this stage, we don’t know if the creation will be done or may fail whatever the reason. This is why the Azure Functions have a verbose logging that will help us understand if things are going in the correct way or not.
When you run the functions locally you can have these logs on your console:
 1
 2
 3
 4
 5
 6
 7
 8
 9
10
11
12
13
14
15
16
17
18
19
20
21
22
23
24
25
26
27
28
29
30
31
32
33
34
35
36
37
38
39
40
41
42
| $ mvn azure-functions:run
[INFO] Scanning for projects...
[INFO]
[INFO] -------------< com.helloworld.group:helloworld-functions >--------------
[INFO] Building Azure Java Functions 1.0-SNAPSHOT
[INFO] --------------------------------[ jar ]---------------------------------
[INFO]
[INFO] --- azure-functions-maven-plugin:1.3.4:run (default-cli) @ helloworld-functions ---
[INFO] Azure Function App's staging directory found at: /Users/nebrass/azure/helloworld-functions/target/azure-functions/hello-world-app-example
[INFO] Azure Functions Core Tools found.
%%%%%%
%%%%%%
@ %%%%%% @
@@ %%%%%% @@
@@@ %%%%%%%%%%% @@@
@@ %%%%%%%%%% @@
@@ %%%% @@
@@ %%% @@
@@ %% @@
%%
%
Azure Functions Core Tools (2.7.1704 Commit hash: fbab3b9c1de5ab95e3b4b6a471ead62c4f37e89c)
Function Runtime Version: 2.0.12742.0
...
[19/10/2019 17:20:13] Host initialized (201ms)
[19/10/2019 17:20:13] Host started (236ms)
[19/10/2019 17:20:13] Job host started
Hosting environment: Production
Content root path: /Users/nebrass/azure/helloworld-functions/target/azure-functions/hello-world-app-example
Now listening on: http://0.0.0.0:7071
Application started. Press Ctrl+C to shut down.
Http Functions:
CosmosDBStoreAnnotation: [POST] http://localhost:7071/api/CosmosDBStoreAnnotation
CosmosDBStoreBinding: [POST] http://localhost:7071/api/CosmosDBStoreBinding
[19/10/2019 17:20:18] Host lock lease acquired by instance ID '0000000000000000000000009DB0E06C'.
|
Now, if we call one of the two available functions, the log will be displayed on the console.
We can call the CosmosDBStoreAnnotation function using the curl tool:
1
| $ curl -i -d '{"name":"nebrass", "email":"[email protected]"}' -H "Content-Type: application/json" -X POST http://localhost:7071/api/CosmosDBStoreAnnotation
|
The curl reponse will look like:
In the console, we will find some thing that looks like this:
 1
 2
 3
 4
 5
 6
 7
 8
 9
10
11
12
13
14
15
16
17
18
19
20
21
22
23
| [19/10/2019...] Executing HTTP request: {
[19/10/2019...] "requestId": "647ca147-3917-4323-951b-b0744c0e2367",
[19/10/2019...] "method": "POST",
[19/10/2019...] "uri": "/api/CosmosDBStoreAnnotation"
[19/10/2019...] }
[19/10/2019...] Executing 'Functions.CosmosDBStoreAnnotation' (Reason='This function was programmatically called via the host APIs.', Id=7582d976-d517-4d43-9b12-f645464705e2)
[19/10/2019...] Java HTTP trigger processed a request.
[19/10/2019...] Document to be saved in DB: {"id":"1465275753", "name":"nebrass", "email":"[email protected]"}
[19/10/2019...] Function "CosmosDBStoreAnnotation" (Id: 7582d976-d517-4d43-9b12-f645464705e2) invoked by Java Worker
[19/10/2019...] Executed 'Functions.CosmosDBStoreAnnotation' (Succeeded, Id=7582d976-d517-4d43-9b12-f645464705e2)
[19/10/2019...] Executed HTTP request: {
[19/10/2019...] "requestId": "647ca147-3917-4323-951b-b0744c0e2367",
[19/10/2019...] "method": "POST",
[19/10/2019...] "uri": "/api/CosmosDBStoreAnnotation",
[19/10/2019...] "identities": [
[19/10/2019...] {
[19/10/2019...] "type": "WebJobsAuthLevel",
[19/10/2019...] "level": "Admin"
[19/10/2019...] }
[19/10/2019...] ],
[19/10/2019...] "status": 200,
[19/10/2019...] "duration": 1161
[19/10/2019...] }
|
In this case; we see that everything is going well.
But, if there is a problem, we will not get a response for the curl command and in the log we will get something like:
 1
 2
 3
 4
 5
 6
 7
 8
 9
10
11
12
13
14
15
16
17
18
19
20
21
22
23
24
| [19/10/2019..] Executing HTTP request: {
[19/10/2019..] "requestId": "28cb88b7-3a7a-4c96-bacc-f70349d30cd9",
[19/10/2019..] "method": "POST",
[19/10/2019..] "uri": "/api/CosmosDBStoreAnnotation"
[19/10/2019..] }
[19/10/2019..] Executing 'Functions.CosmosDBStoreAnnotation' (Reason='This function was programmatically called via the host APIs.', Id=627d4d5d-6064-4322-aa2d-5ee1050f9a89)
[19/10/2019..] Java HTTP trigger processed a request.
[19/10/2019..] Document to be saved in DB: {"id":"1234769986", "name":"nebrass", "email":"[email protected]"}
[19/10/2019..] Function "CosmosDBStoreAnnotation" (Id: 627d4d5d-6064-4322-aa2d-5ee1050f9a89) invoked by Java Worker
[19/10/2019..] Executed 'Functions.CosmosDBStoreAnnotation' (Failed, Id=627d4d5d-6064-4322-aa2d-5ee1050f9a89)
[19/10/2019..] System.Private.CoreLib: Exception while executing function: Functions.CosmosDBStoreAnnotation. System.Private.CoreLib: The input is not a valid Base-64 string as it contains a non-base 64 character, more than two padding characters, or an illegal character among the padding characters.
[19/10/2019..] Executed HTTP request: {
[19/10/2019..] "requestId": "28cb88b7-3a7a-4c96-bacc-f70349d30cd9",
[19/10/2019..] "method": "POST",
[19/10/2019..] "uri": "/api/CosmosDBStoreAnnotation",
[19/10/2019..] "identities": [
[19/10/2019..] {
[19/10/2019..] "type": "WebJobsAuthLevel",
[19/10/2019..] "level": "Admin"
[19/10/2019..] }
[19/10/2019..] ],
[19/10/2019..] "status": 500,
[19/10/2019..] "duration": 14
[19/10/2019..] }
|
We can easily notice that there is a problem in the execution, and even there is a {status: 500} for the HTTP Request, which is the same headers sent back to the curl command.
Great ! Let’s continue our trip ! 🤩
HTTP to Service Bus function#
Based on the previous section, the HTTP to Service Bus Function will look like:
 1
 2
 3
 4
 5
 6
 7
 8
 9
10
11
12
13
14
15
16
17
18
19
20
21
22
23
24
25
26
27
28
29
30
31
32
33
34
| @FunctionName("ServiceBusStoreAnnotation")
@ServiceBusQueueOutput(
name = "hello-world-app-queue-output",
queueName = "hello-world-app-queue",
connection = "ServiceBusConnection")
public String run(
@HttpTrigger(
name = "req",
methods = {HttpMethod.POST},
authLevel = AuthorizationLevel.FUNCTION) HttpRequestMessage<Optional<String>> request,
final ExecutionContext context) {
context.getLogger().info("Java HTTP trigger processed a request.");
String name = EMPTY;
String email = EMPTY;
// Parse query parameter
if (request.getBody().isPresent()) {
JSONObject jsonObject = new JSONObject(request.getBody().get());
name = jsonObject.getString("name");
email = jsonObject.getString("email");
}
// Generate random ID
final String id = String.valueOf(new Random().nextInt());
// Generate Student
Student student = new Student(id, name, email);
final String message = student.toString();
context.getLogger().info(String.format("Document to be sent to Queue: %s", message));
return message;
}
|
When called, the log of this function will look like:
 1
 2
 3
 4
 5
 6
 7
 8
 9
10
11
12
13
14
15
16
17
18
19
20
21
22
23
| [19/10/2019..] Executing HTTP request: {
[19/10/2019..] "requestId": "a36738f3-e1fa-4c78-8600-7b4039382703",
[19/10/2019..] "method": "POST",
[19/10/2019..] "uri": "/api/ServiceBusStoreAnnotation"
[19/10/2019..] }
[19/10/2019..] Executing 'Functions.ServiceBusStoreAnnotation' (Reason='This function was programmatically called via the host APIs.', Id=149530e6-d0c9-4c90-b582-726c6cac7cc0)
[19/10/2019..] Java HTTP trigger processed a request.
[19/10/2019..] Document to be sent to Queue: {"id":"954440360", "name":"nebrass", "email":"[email protected]"}
[19/10/2019..] Function "ServiceBusStoreAnnotation" (Id: 149530e6-d0c9-4c90-b582-726c6cac7cc0) invoked by Java Worker
[19/10/2019..] Executed 'Functions.ServiceBusStoreAnnotation' (Succeeded, Id=149530e6-d0c9-4c90-b582-726c6cac7cc0)
[19/10/2019..] Executed HTTP request: {
[19/10/2019..] "requestId": "a36738f3-e1fa-4c78-8600-7b4039382703",
[19/10/2019..] "method": "POST",
[19/10/2019..] "uri": "/api/ServiceBusStoreAnnotation",
[19/10/2019..] "identities": [
[19/10/2019..] {
[19/10/2019..] "type": "WebJobsAuthLevel",
[19/10/2019..] "level": "Admin"
[19/10/2019..] }
[19/10/2019..] ],
[19/10/2019..] "status": 200,
[19/10/2019..] "duration": 1300
[19/10/2019..] }
|
Everything is good ! No Bad News Is Good News ! As there is no errors means every thing is working like a charm 🥳
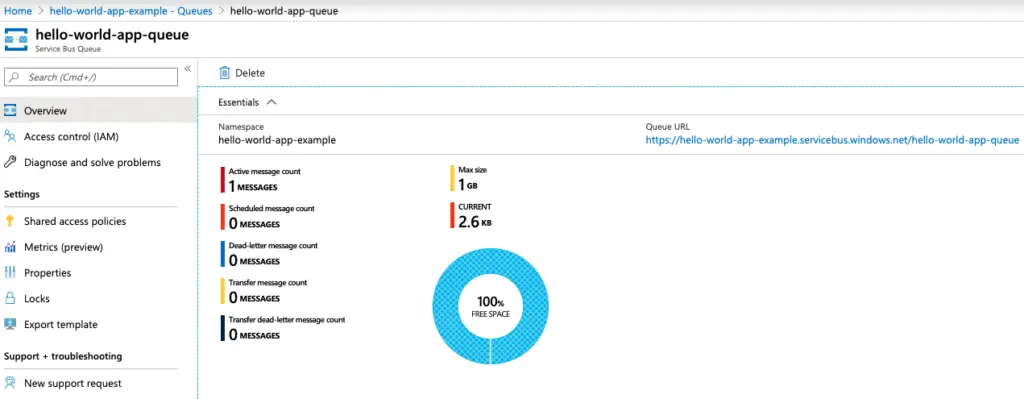
We can check on the Azure Portal that there is a Message on the Service Bus Queue:
Service Bus Message to Cosmos DB function#
Now, we will create the function that will be triggered by a message in the Service Bus Queue and will insert data to Cosmos DB. The function will look like:
 1
 2
 3
 4
 5
 6
 7
 8
 9
10
11
12
13
14
15
16
17
18
19
20
21
22
23
| @FunctionName("ServiceBusMessageToCosmosDb")
public void run(
@ServiceBusQueueTrigger(
name = "messageTrigger",
queueName = "hello-world-app-queue",
connection = "ServiceBusConnection"
) String student,
@CosmosDBOutput(
name = "database",
databaseName = "university",
collectionName = "students",
connectionStringSetting = "CosmosDbConnection")
OutputBinding<String> outputItem,
final ExecutionContext context) {
context.getLogger().info(String.format("Service Bus message trigger processed a request: %s", student));
// This line will be used to validate the received JSON
String jsonValue = new JSONObject(student).toString();
context.getLogger().info(String.format("Document to be saved in DB: %s", jsonValue));
outputItem.setValue(jsonValue);
}
|
When we run our Functions Application, the Message that is already in the Service Bus Queue will be consumed - the execution log:
 1
 2
 3
 4
 5
 6
 7
 8
 9
10
| [19/10/2019..] Executing 'Functions.ServiceBusMessageToCosmosDb' (Reason='New ServiceBus message detected on 'hello-world-app-queue'.', Id=dcb8e81d-f09e-48ee-a236-49542ae2e34d)
[19/10/2019..] Trigger Details: MessageId: f5a0a1d6e5e94fc790aed052217dda5a, DeliveryCount: 1, EnqueuedTime: 19/10/2019 17:47:39, LockedUntil: 19/10/2019 18:00:44
[19/10/2019..] Service Bus message trigger processed a request: {
[19/10/2019..] "id": "954440360",
[19/10/2019..] "name": "nebrass",
[19/10/2019..] "email": "[email protected]"
[19/10/2019..] }
[19/10/2019..] Document to be saved in DB: {"name":"nebrass","id":"954440360","email":"[email protected]"}
[19/10/2019..] Function "ServiceBusMessageToCosmosDb" (Id: dcb8e81d-f09e-48ee-a236-49542ae2e34d) invoked by Java Worker
[19/10/2019..] Executed 'Functions.ServiceBusMessageToCosmosDb' (Succeeded, Id=dcb8e81d-f09e-48ee-a236-49542ae2e34d)
|
Yooppi 🥳 every thing is working like a charm ! 🥰
Now, we will see how to debug our Azure Functions Java Application 😁
DEBUGGING the Azure Functions Application Locally#
To debug the application locally just do: mvn clean package azure-functions:run -DenableDebug to run the Azure Functions application in the Debugging Mode.
In you IDE, you need to attach a debugger to the Host: localhost and the Port: 5005.
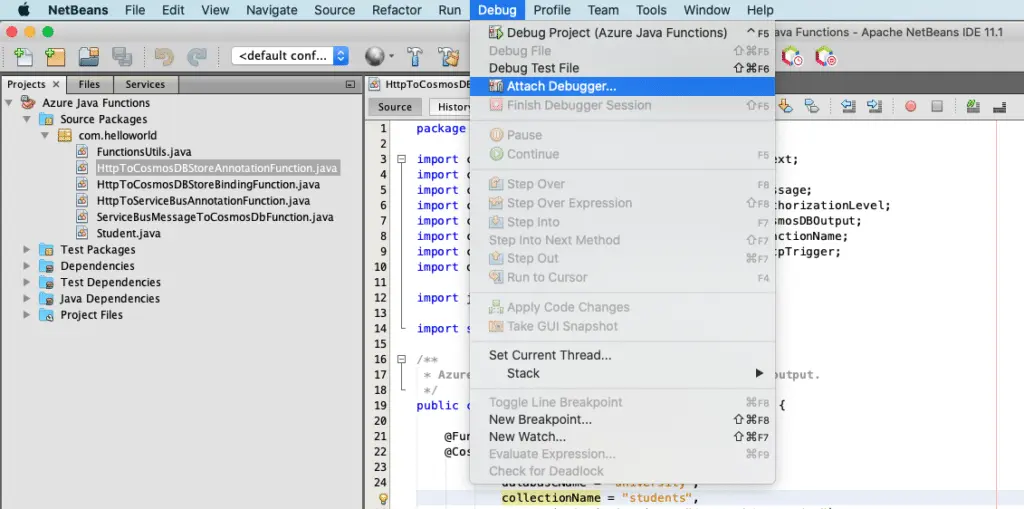
For NetBeans In the Debug menu, click on Attach Debugger:
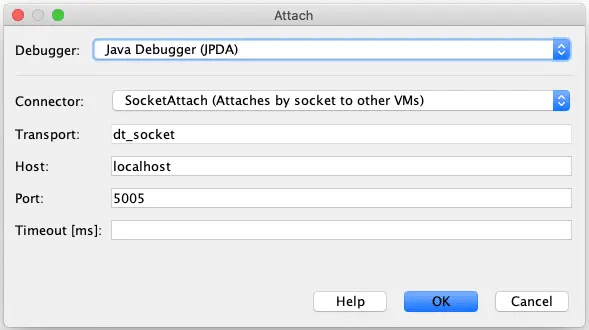
Next, in the Attach Debugger window, we need to make localhost as Host and 5005 as Port:
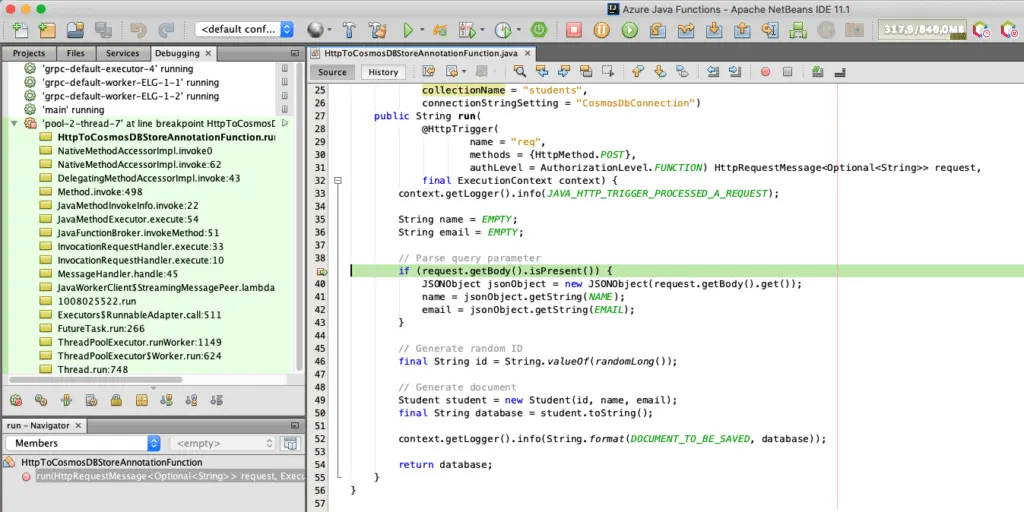
Next, try to put a breakpoint and call your application, you will see your application pause on your breakpoint:
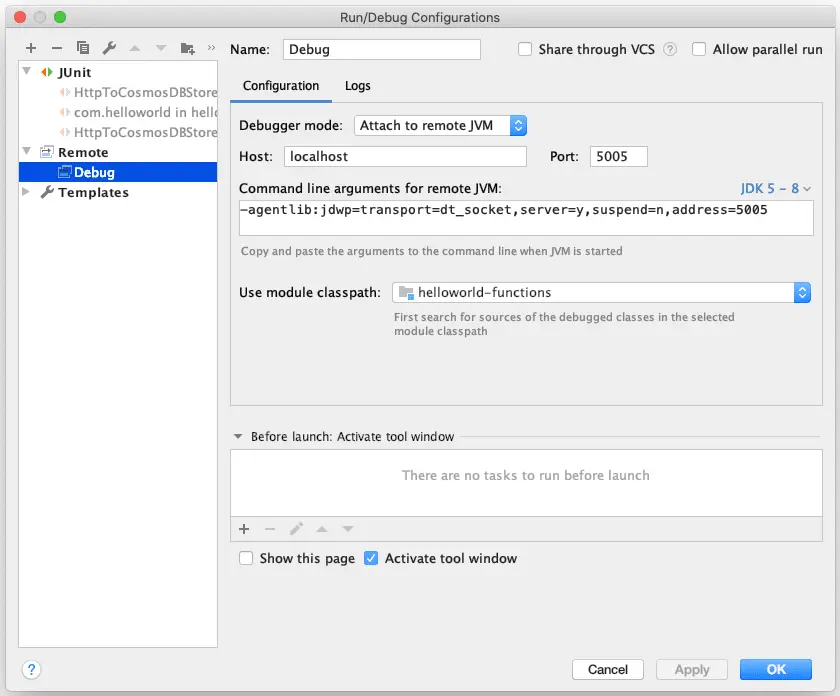
For IntelliJ In the Run menu, select Edit Configurations, next click on the (+) button..
On the Configuration section:
- Host: localhost
- Port: 5005
- Cmd line arguments:
-agentlib:jdwp=transport=dt_socket,server=y,suspend=n,address=5005
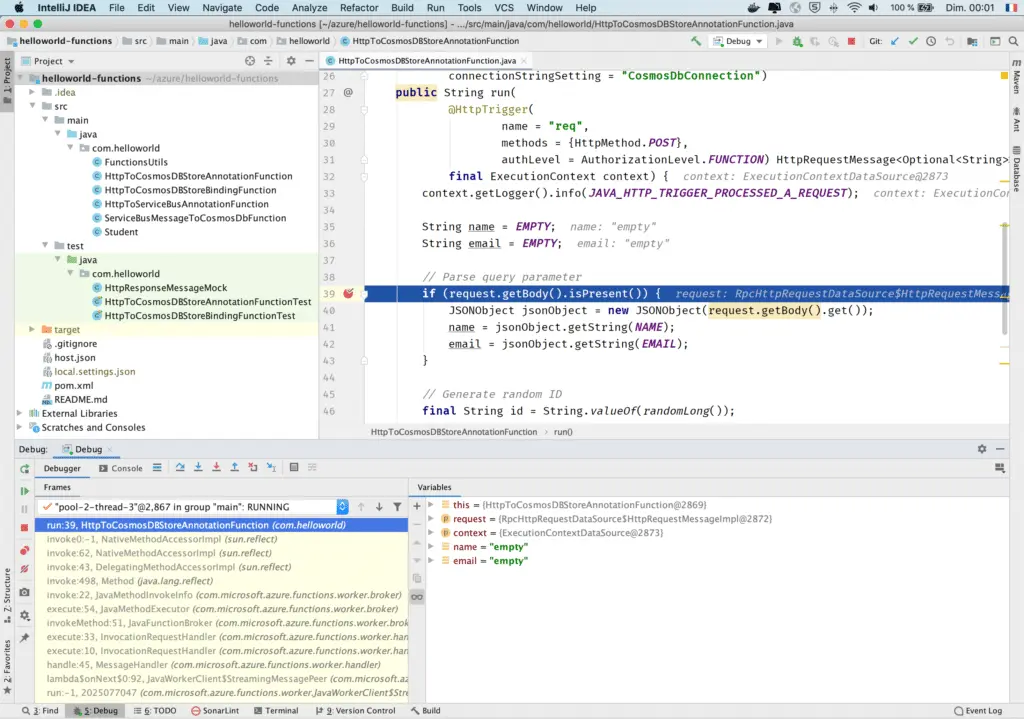
Now, you can put a breakpoint in your code, start the application in Debug Mode, run the Remote Debug configuration that you just created in IntelliJ. When you invoke one of the functions, you will see the application pause on the breakpoint.
Cool ! Let’s move to the deployment part ! 🤩
Deploying the Azure Functions Java Application#
Let’s deploy our Azure Functions Application:
 1
 2
 3
 4
 5
 6
 7
 8
 9
10
11
12
13
14
| $ mvn package azure-functions:deploy
...
[INFO] --- azure-functions-maven-plugin:1.3.4:deploy (default-cli) @ helloworld-functions ---
[INFO] Authenticate with Azure CLI 2.0
[INFO] Updating the specified function app...
[INFO] Java version of function host : 1.8
[INFO] Set function worker runtime to java
[INFO] Successfully updated the function app.hello-world-app-example
[INFO] Trying to deploy the function app...
[INFO] Trying to deploy artifact to hello-world-app-example...
[INFO] Successfully deployed the artifact to https://hello-world-app-example.azurewebsites.net
[INFO] Successfully deployed the function app at https://hello-world-app-example.azurewebsites.net
...
|
Great! Our application is deployed ! 🥳🥳
Let’s enjoy our functions ! 🤩
Consuming the Deployed Azure Functions Application#
In the deployment log, we see that our Functions App is deployed to https://hello-world-app-example.azurewebsites.net .
Let’s try our curl command on this host:
1
2
| $ curl -i -X POST https://hello-world-app-example.azurewebsites.net/api/ServiceBusStoreAnnotation
-d '{"name":"nebrass", "email":"[email protected]"}'
|
We will get something like:
1
2
3
4
5
6
| HTTP/1.1 401 Unauthorized
Set-Cookie: ARRAffinity=8ba760adb9686d1725150fb81799ab65bc89ea938e47cc3c421bf92dc2df040a;Path=/;HttpOnly;Domain=hello-world-app-example.azurewebsites.net
Request-Context: appId=cid-v1:e3232f0f-c61a-48c2-92b8-537739c295b6
Set-Cookie: ARRAffinity=5d57fdaf326a15958b2bfa6786e779beb79860d9cad630e44e1343796e5fac76;Path=/;HttpOnly;Domain=hello-world-app-example.azurewebsites.net
Date: Sat, 19 Oct 2019 18:20:29 GMT
Content-Length: 0
|
HTTP 401 Unauthorized 😳😱😭😰😣😫 !!!
But from where comes the Authorization ? Did we secured our Functions ??
Actually, yes and this comes in the generated function sample. In the method signature, there is a @HttpTrigger annotation with an attribute authLevel=AuthorizationLevel.FUNCTION . In the Javadoc of this annotation, we see that authLevel determines what keys, if any, need to be present on the request in order to invoke the function. The authorization level can be one of the following values:
- anonymous: No API key is required.
- function: A function-specific API key is required. This is the default value if none is provided.
- admin: The master key is required.
Good ! So we need to have an API Key to be able to consume our Functions. Great, but from where we can get that? 🤓
KEEP CALM ! 😤 Everything is easy to find in the Azure Portal 😁
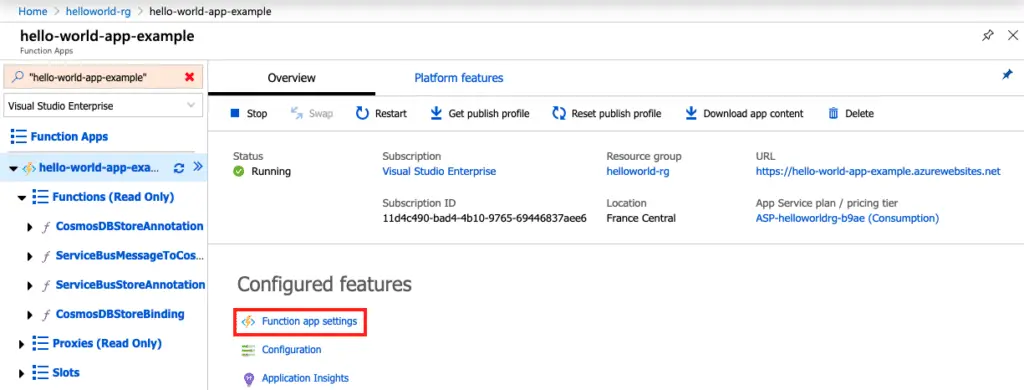
Go to the Azure Functions Application, then click on Function App Settings:
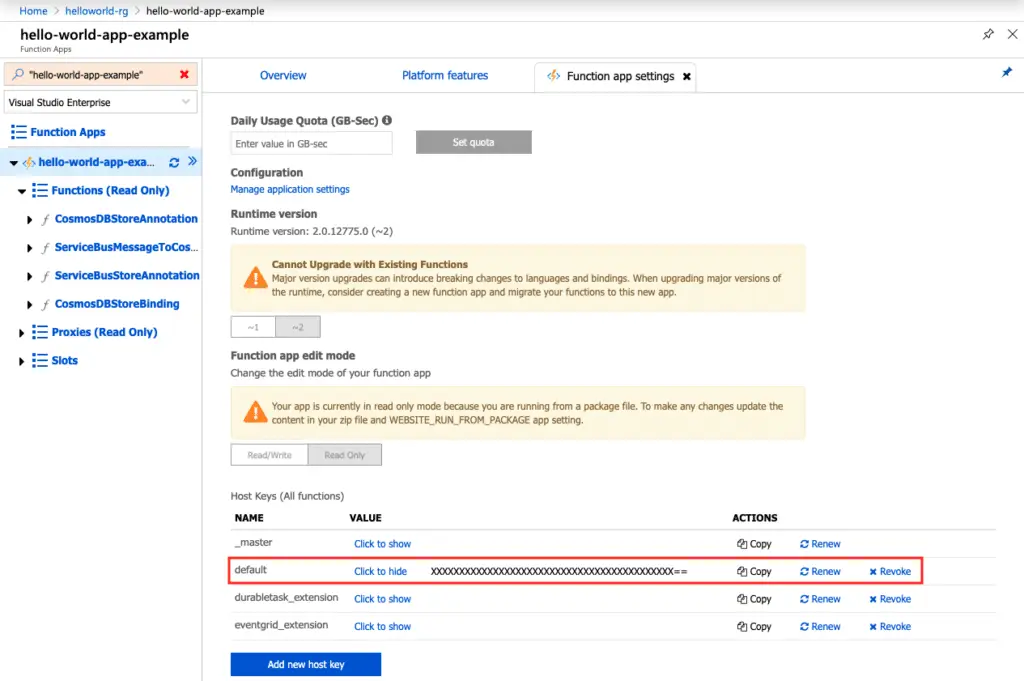
Next, in this window, you will find the default Host Keys:
The Azure Functions API keys can be either:
- a Host Key : an API Key that can be used with all the functions in the same application
- a Function Key: an API Key that can be used for only an assigned the function
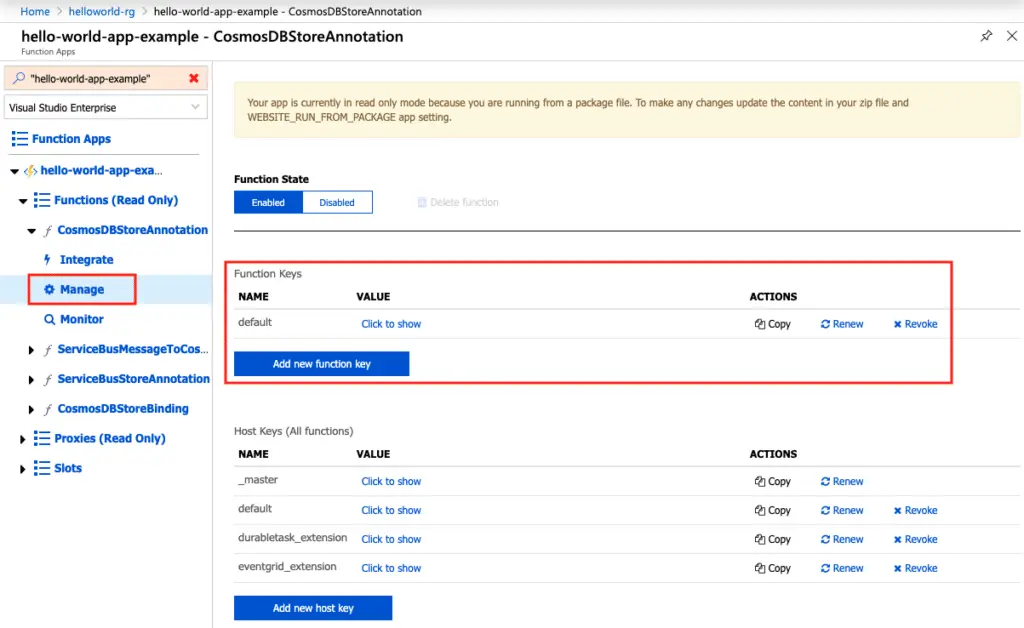
Based on this definition, if we want to generate a Function Key, we need to go to the Function, next, click on Manage:
Next, after you copy the Key, you need to include it to the request. We can do that in several ways:
- in the URL: https://APP_URL/api/CosmosDBStoreAnnotation?code=XXXXXXXXXXXXXXXXXXXXXXX
- in the headers, in a format: Key=x-functions-key and Value=XXXXXXXXXXXXXXXXXXXXXXX
Great ! Let’s test the curl again:
1
2
| $ curl -i -X POST https://hello-world-app-example.azurewebsites.net/api/ServiceBusStoreAnnotation?code=XXXXXXXXXXXXXXXXXXX==
-d '{"name":"nebrass", "email":"[email protected]"}'
|
1
2
3
4
5
6
7
8
9
| HTTP/1.1 200 OK
Content-Length: 68
Content-Type: text/plain; charset=utf-8
Set-Cookie: ARRAffinity=aaaaaabbbbbbbbcccccccdddddeeeeeefffffff;Path=/;HttpOnly;Domain=hello-world-app-example.azurewebsites.net
Request-Context: appId=cid-v1:12345678-abcd-efgh-xywz-537739c295b6
Set-Cookie: ARRAffinity=wwwwwwxxxxxxxxvvvvvvvuuuuuiiiiiihhhhhhh;Path=/;HttpOnly;Domain=hello-world-app-example.azurewebsites.net
Date: Sat, 19 Oct 2019 20:03:48 GMT
{"id":"1251989744", "name":"nebrass", "email":"[email protected]"}%
|
Youuppiiii !!! 😁
Monitoring the Azure Functions Application#
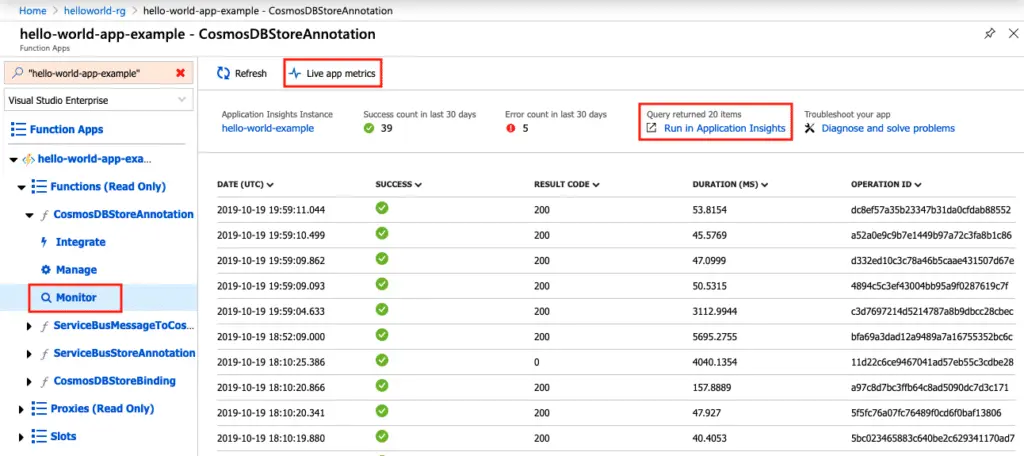
When we created our application, we created an Application Insights account. To access the Azure Functions Monitoring, you need to go to the Function, next you click on the Monitor menu. Here you will find the latest requests with a small stats about the successful and failing ones:
To check more, you can click on a request to see more details. Or even you can click on:
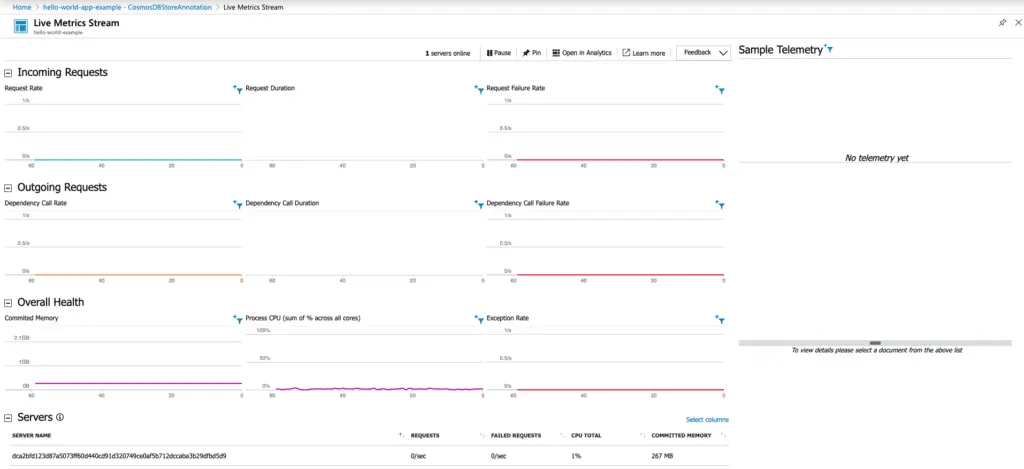
- Live app metrics to access the Metrics dashboard for our Functions application.
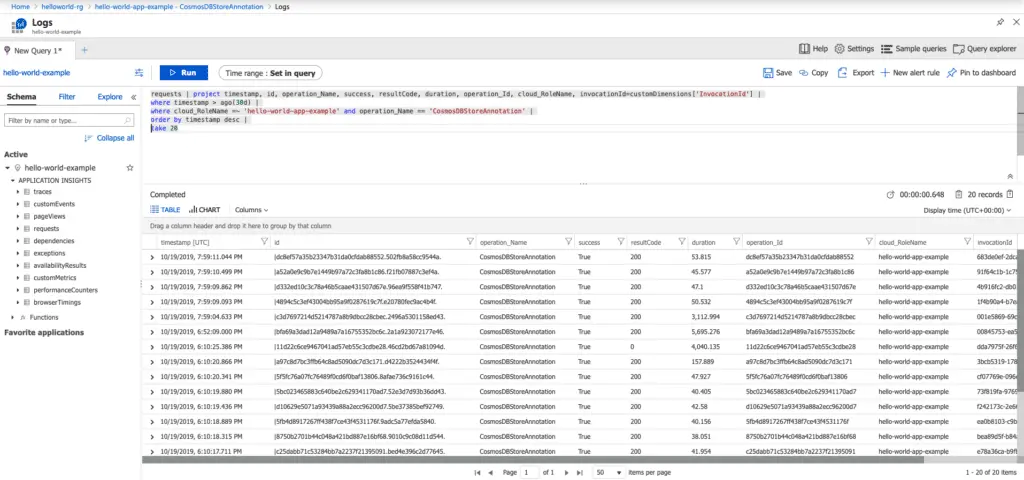
- Run in Application Insights to access the detailed Logs and Log Analytics platform for our Functions application.
Cool ! As you see, we can do many crazy things easily with the Azure Functions, in a very efficient way. No hard configuration, no crazy yaml configuration files..
The Azure Functions is one of the most wonderful products that I like in the Azure world 🤩 I really will try to go deep more and more in this great service. I will try to write an other tutorial when needed.
Feel free to try in deep this tutorial and I will be interested to get your feedback. If you have a request or any inquiry, feel free to get in touch with me 😄