Introduction
Recently, I got the chance to work on a project dealing with Computer Vision ! In the investigation phase, I discovered an interesting product: the NVIDIA DeepStream SDK ! Even when NVIDIA DeepStream was not adopted for our project 😅 I had a strong desire to discover this platform. I really cannot say if it’s a platform, a set of tools, a set of platforms, or even a full universe. 😊
Although I usually cover only Java & Cloud technologies, today I’m going to cover some topic totally new. Soon you will find out why.
Context and Requirements
In one of our projects, we had a computer vision part, that needs to do Object Detection on an RTSP Stream input. When I started the investigation, I found out that there are many solutions that offering this: Azure Computer Vision, AWS Recognition, NVIDIA DeepStream, Intel OpenVino, GStreamer with OpenCV, etc. In our use case, we decided to go for Azure Computer Vision, as it matches the requirements and the constraints of our project. However, I was curious about DeepStream, and all the promises that NVIDIA is making about its product.
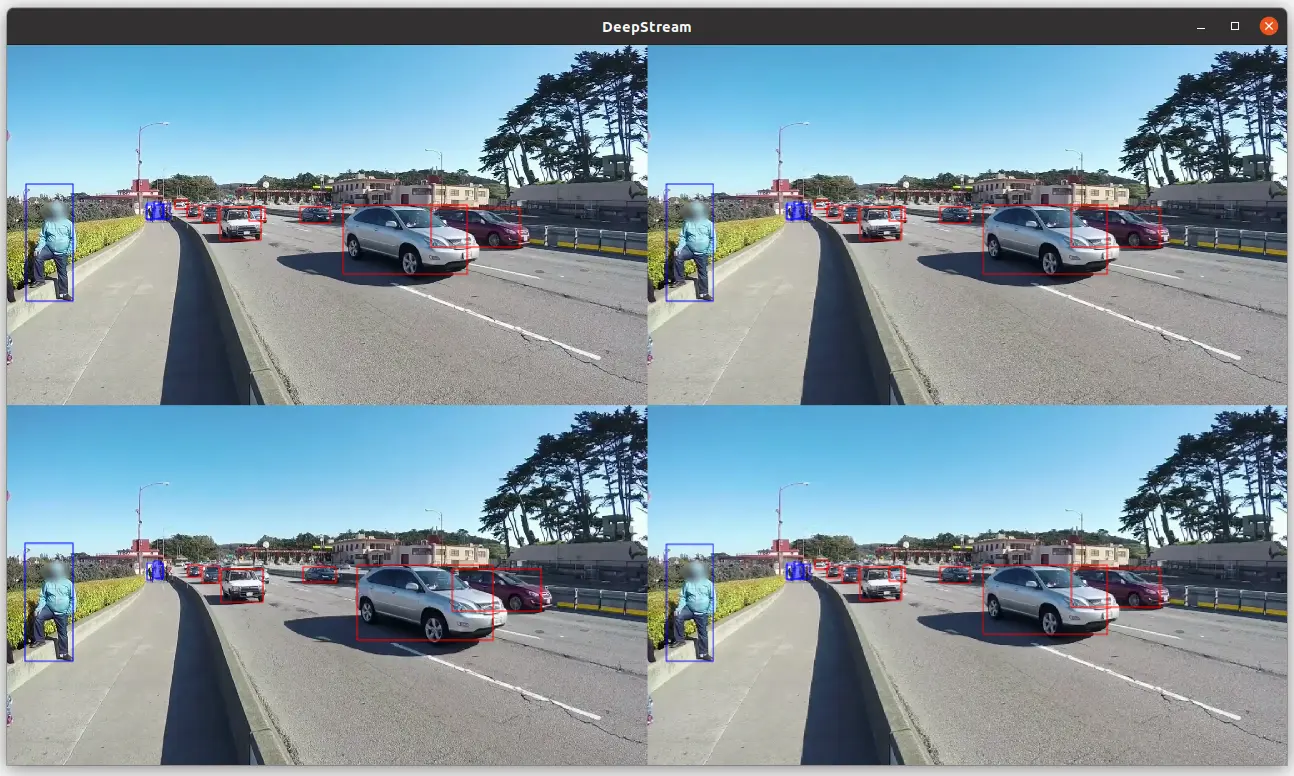
This was the video that caught my attention 👇
The video showcases a 3-minutes demo of NVIDIA DeepStream object detection, processing 8 video inputs simultaneously on an NVIDIA Jetson Nano device. While this may seem ordinary at the beginning, it becomes impressive when considering the Jetson Nano is a small single-board computer equipped with a quad-core ARM Cortex-A57 64-bit 1.43 GHz CPU, a 4 GB of RAM, a 128 cores GPU and no hard disk – but using a MicroSD card for storage. Given these specifications, the fluidity of the demo is truly wonderful. At this moment, love at first sight was born. 🥰
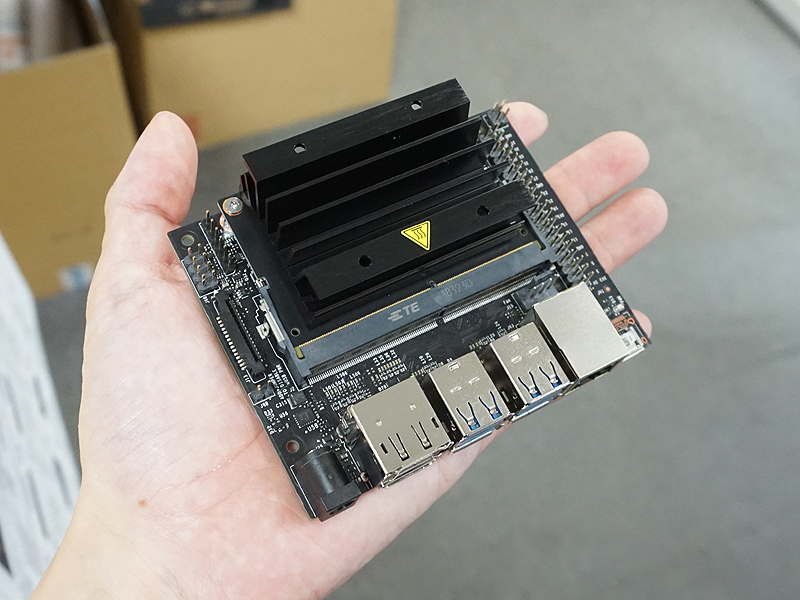
NVIDIA Jetson Nano size in Hand
NVIDIA DeepStream SDK
I this section, we will have many, MANY, MaNy 🤪 definitions. I will try to bring them from the official documentation and make the necessary simplifications for better understanding.
NVIDIA DeepStream SDK Logo
The NVIDIA DeepStream SDK is a complete streaming analytics toolkit based on the open source GStreamer multimedia framework.
💡 GStreamer is a library for constructing graphs of media-handling components. The applications built with GStreamer, range from simple Ogg/Vorbis playback, audio/video streaming to complex audio (mixing) and video (non-linear editing) processing. For example, Rhythmbox, the famous audio player for Linux, is built on GStreamer.
The DeepStream SDK accelerates development of scalable Intelligent Video Analytics applications, making it easier for developers to build core deep learning networks instead of designing end-to-end applications from scratch.
DeepStream SDK is supported on systems that contain an NVIDIA Jetson module or an NVIDIA dGPU adapter.
ℹ️ NVIDIA dGPU adapter: NVIDIA Dedicated Graphics Processing Unit Adapter
DeepStream is an extensible collection of hardware-accelerated plugins that interact with low-level libraries to optimize performance. This architecture defines a standardized metadata structure enabling custom/user-specific additions.
👉 This is one of the major factors contributing to the seamless of the object detection Demo on the Jetson Nano.
Now we will dig into the GStreamer world 🕵🏻♂️
GStreamer
GStreamer is a framework for creating streaming media applications. It makes it possible to write any type of streaming multimedia application. The GStreamer framework is designed to make it easy to write applications that handle audio or video or both. It isn’t restricted to audio and video, and can process any kind of data flow. The pipeline design is made to have little overhead above what the applied filters induce. This makes GStreamer a good framework for designing even high-end audio applications which put high demands on latency. 👈 Obviously, DeepStream is a good example 😁
GStreamer logo
GStreamer offers a huge set of components that can be used to create complete features. Each component is a module that performs a specific task or operation. By combining these components, it is possible to create complex and powerful multimedia applications. In GStreamer, a combination of such components is referred to as a Pipeline.
The GStreamer core function is to provide a framework for plugins, data flow and media type handling/negotiation. It also provides an API to write applications using the various plugins. A Plugin is a collection of one or more components.
Specifically, GStreamer provides:
- an API for multimedia applications
- a plugin architecture
- a pipeline architecture
- a mechanism for media type handling/negotiation
- a mechanism for synchronization
- over 250 plug-ins providing more than 1000 elements
- a set of tools
In the next step, we will talk about the GStreamer fundamentals, Foundations as called in the official documentation.
GStreamer Foundations
In this part, we will introduce the basic concepts of GStreamer.
Elements
The most important object in GStreamer for the application programmer is the GstElement object. An element is the basic building block for a media pipeline. All the different high-level components you will use are derived from GstElement.
Elements can be categorized into several types based on their functionality:

GStreamer Elements Types
Sources
Source elements are responsible for producing data in the pipeline, such as reading from a disk or a sound card. Unlike other elements in the pipeline, source elements do not receive data as input. The graphical representation of the source element looks like:
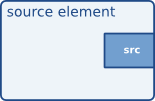
GStreamer Source Element
ℹ️ Given that the Pipeline flow is schematized from Left to Right, this is why the source pad is drawn on the left of the box: it only produces output data, which is then consumed by subsequent elements in the pipeline.
Sinks
Sink elements are end points in a media pipeline. They accept data but do not produce anything. Disk writing, soundcard playback, and video output would all be implemented by sink elements.
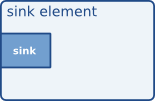
GStreamer Sink Element
ℹ️ As opposed to a Source Element, this is why the sink pad is drawn on the left of the box: it only consumes the incoming data.
Filters
Filters elements have both input and outputs pads. They operate on data that they receive on their input (sink) pads, and will provide data on their output (source) pads. Examples of such elements are a volume element (filter), a video scaler (convertor), a Vorbis decoder, etc.
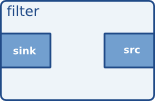
GStreamer Filter Element
There are other filter-like elements that have more than one output. An example of this, can be a Demuxer: which is an element that separates and extracts individual streams, such as audio, video, or subtitles, from a single multimedia container file or stream for further processing or playback. This is why it has more pads in the right side of the vizualisation box:
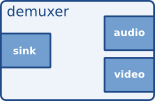
GStreamer Demuxer Element
Let’s go on some filters examples:
- Encoder: a component that compresses raw, uncompressed multimedia data, converting it into a more compact, encoded format suitable for storage or transmission.
- Decoder: a component that decompresses encoded multimedia data from an input stream, converting it into raw, uncompressed data for further processing or playback.
- Muxer: a component that combines multiple input streams, such as audio, video, or subtitles, into a single output stream within a specific container format, ensuring proper synchronization and compatibility between the individual streams.
- Demuxer: a component that separates and extracts individual streams, such as audio, video, or subtitles, from a single multimedia container file or stream for further processing or playback.
- Parser: a component that processes and analyzes an input stream of encoded multimedia data, extracting relevant information and preparing the data for further processing or decoding.
- Converter: a component that transforms multimedia data between different formats, such as color spaces, sample rates, or channel layouts, to ensure compatibility with subsequent processing stages or playback devices.
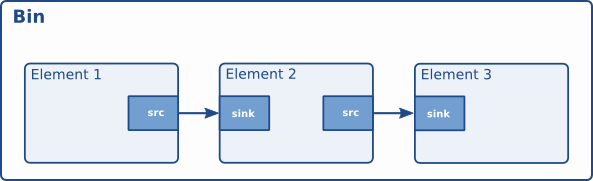
Linking elements
Linking elements creates a Media Pipeline. For example, we must have a Source Element and a Sink Element and optionally between them, zero or many Filter Elements. A visualization of a sample Media Pipeline looks like:

Linking elements GStreamer
The Media Pipeline works like this: the output of the Source element will be used as input for the Filter-Like element. The Filter-Like element will do something with the data and send the result to the final Sink element.
Let’s take a concrete example: a Music player:
- Source element: reads the file from disk 📀
- Filter element: a decoder that decompresses the encoded audio stream 🏭
- Sink element: will output the audio to the playback sound device 🔊
Pads
As we have seen in Elements section, the Pads are the Element’s interface to the outside world. Data streams from one Element’s source pad to another element’s sink pad. The specific type of media that the element can handle will be exposed by the pad’s capabilities.
A pad type is defined by two properties: its direction and its availability:
- Pad directions: Source pads and Sink pads
- Pad availability: A Pad can have any of three availabilities:
- always: always pads always exist
- sometimes: sometimes pads exist only in certain cases (and can disappear randomly)
- on request: pads appear only if explicitly requested by applications
ℹ️ Some elements might not have all of their pads when the element is created. This can happen, for example, with an Ogg demuxer element. The Element will read the Ogg stream and create dynamic pads for each contained elementary stream (vorbis, theora) when it detects such a stream in the Ogg stream. Likewise, it will delete the pad when the stream ends. This principle is very useful for demuxer elements**, for example.
Bins and Pipelines
Bins are container elements that can hold and manage a collection of other elements, including sources, sinks, and filters. Bins simplify the organization and control of complex pipelines by grouping related elements together, making them easier to manipulate as a single unit. Bins can also be nested, allowing for hierarchical structures and further abstraction of media processing tasks.
GStreamer Bin
A Pipeline is a specialized type of bin, that manages the synchronization and Bus messages of the contained elements. The toplevel bin has to be a pipeline, every application thus needs at least one of these.
Bus
A Bus is a simple system that takes care of forwarding messages from the streaming threads to an application in its own thread context. The advantage of a Bus is that an application does not need to be thread-aware in order to use GStreamer, even though GStreamer itself is heavily threaded.
Every pipeline contains a Bus by default, so applications do not need to create a Bus or anything. The only thing applications should do is set a message handler on a Bus, which is similar to a signal handler to an object. When the mainloop is running, the Bus will periodically be checked for new messages, and the callback will be called when any message is available.
Buffers and Events
The data flowing within a GStreamer Pipeline consists of a combination of buffers, events and Query.
- Buffers: Hold the actual multimedia data that is being processed and transported through the pipeline.
- Events: Carry metadata and control information, such as state changes, seeking, or end-of-stream notifications, between elements in the pipeline.
- Queries: Retrieve information from elements within the pipeline, such as position, duration, capabilities, or available formats.
All this will flow through the pipeline automatically when it’s running.
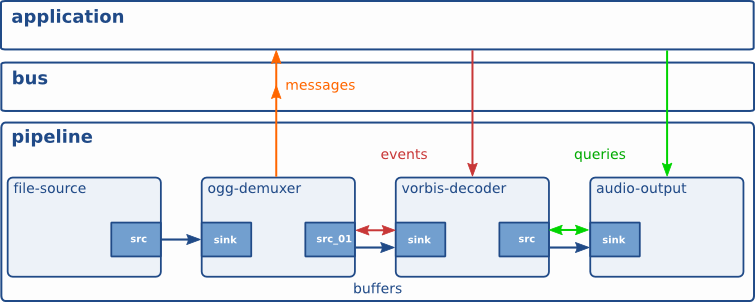
GStreamer Communication
DeepStream GStreamer Plugins
NVIDIA DeepStream is a GStreamer based solution and consists of set of GStreamer plugins that NVIDIA implemented using low-level libraries optimized for their GPUs. There are many plugins, but I will cover the ones that I consider the most important:
NvVideo4Linux2
A hardware-accelerated video decoder element for GStreamer, provided by NVIDIA as part of the DeepStream SDK. It utilizes the Video4Linux2 (V4L2) API with NVIDIA’s proprietary hardware-accelerated codecs to decode video streams more efficiently, offloading the processing workload from the CPU to the GPU. Nvvideo4linux2 supports various video formats and can significantly improve the performance of video decoding tasks in GStreamer pipelines on supported NVIDIA hardware.
NvVideoConvert
A GStreamer element provided by NVIDIA, which performs efficient hardware-accelerated video format conversion, scaling, and color space conversion on NVIDIA platforms. It is commonly used in GStreamer pipelines to process and convert video frames to formats compatible with other elements, leveraging the GPU capabilities to offload the processing workload from the CPU and improve overall performance.
NvStreamMux
A GStreamer element provided by NVIDIA as part of the DeepStream SDK, which is used to batch multiple video streams into a single output stream for efficient parallel processing in AI and deep learning applications. It is designed to work with NVIDIA hardware and helps optimize the performance of video analytics pipelines by consolidating multiple input streams for simultaneous processing by subsequent elements, such as neural networks or other video processing components.
NvInfer
A GStreamer element provided by NVIDIA as part of the DeepStream SDK, designed to perform hardware-accelerated inference using TensorRT. NvInfer allows for seamless integration of AI models, such as neural networks for object detection or image classification, into GStreamer pipelines, enabling efficient video analytics and real-time processing on NVIDIA platforms.
NvDsAnalytics
A GStreamer element provided by NVIDIA as part of the DeepStream SDK, designed to perform region of interest (ROI) analytics and generate metadata based on user-defined rules. It allows for real-time processing and analysis of video data, enabling applications like object counting, line crossing detection, or occupancy detection in specified regions within a video frame.
NvDsOSD
Also known as On-Screen Display is a GStreamer element provided by NVIDIA as part of the DeepStream SDK, which is used for rendering text, bounding boxes, and other graphical overlays on video frames. Commonly employed in video analytics and AI applications, NvDsOSD can display information such as object labels, detection scores, or custom metadata on the video output, helping visualize the results of the processing performed by other elements in the pipeline, like NvInfer or NvDsAnalytics.
Pipeline Example
Let’s take the example of the DeepStream reference application: a GStreamer based solution; composed of set of GStreamer plugins encapsulating low-level APIs to form a complete graph. The reference application has capability to accept input from various sources like an RTSP input or an encoded file input, and additionally supports multi stream/source capability. The application pipeline looks like:
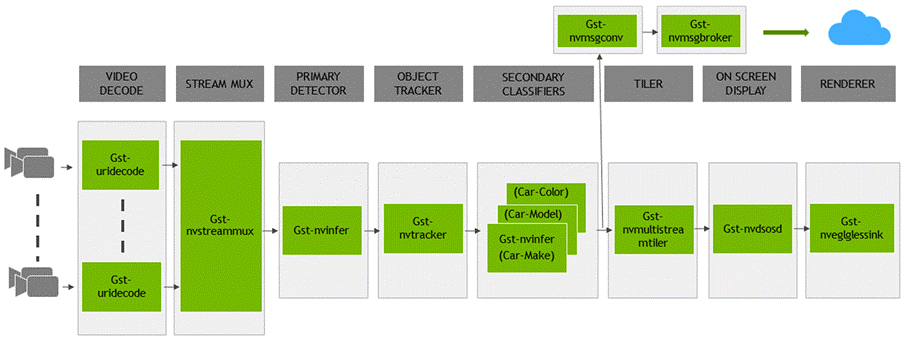
NVIDIA DeepStream reference application architecture
This application contains a list of GStreamer plugins implemented by NVIDIA and provided as a part of DeepStream SDK:
- The Video Decode using
Gst Uri Decodetakes the input video file specified by a URI and decodes it into a raw media. - The Stream Muxer plugin (
Gst-nvstreammux) to form a batch of buffers from multiple input sources. - The Preprocess plugin (
Gst-nvdspreprocess) for pre-processing on the pre-defined ROIs for primary inferencing. - The NVIDIA TensorRT based plugin (
Gst-nvinfer) for primary and secondary detection and classification respectively. - The Multi-Object Tracker plugin (
Gst-nvtracker) for object tracking with unique ID. - The Multi Stream Tiler plugin (
Gst-nvmultistreamtiler) for forming 2D array of frames. - The Onscreen Display (OSD) plugin (
Gst-nvdsosd) to draw shaded boxes, rectangles and text on the composited frame using the generated metadata. - The Message Converter (
Gst-nvmsgconv) and Message Broker (Gst-nvmsgbroker) plugins in combination to send analytics data to a server in the Cloud.
DeepStream Requirements
This is the part that took consumed so long time for me; I had many many issues while trying to intall DeepStream SDK correctly. Especially that the official installation guide is not SoOoOo clear 😒
The guide is covering some specific versions:
- Ubuntu 20.04
- GStreamer 1.16.3
- NVIDIA driver 525.125.06
- CUDA 12.1
- TensorRT 8.5.3.1
But the ones that I’m using 😎
- Ubuntu 20.04
- GStreamer 1.16.3
- NVIDIA driver 530.41.03
- CUDA 12.1
- TensorRT 8.6.1.6
When I saw these versions, I thought that these ones were taken as example. I didn’t know that these are in reality requirements. I made many mistakes:
- Tried to install NVIDIA DeepStream on an Ubuntu 22.04 😡
- Tried to install the latest CUDA and TensorRT versions, thinking that, the lastest is the best 🥴
- I tried to force the CUDA and TensorRT versions with a non-compatible GPU driver version 😨
And I was each time formatting my machine, to have a fresh install to be sure to make everything work.
To verify that the installation is working, use these commands
| |
If you get a screen like this, your install is quite good 😎
The NVIDIA DeepStream SDK screen
Writing the DeepStream Application
Now, we will write code, finally ! 😁
Our application will be a Python application that takes an RTSP link for a video stream and uses the YOLOv8 model for inference. The output will be an RTSP video stream of the analyzed video.
ONNX and Custom NvDsInfer Build
First of all, follow this guideline to download the YoloV8 model. I know that there are many guidelines about getting the YoloV8, but this guideline is dedicated for getting an ONNX model file for YoloV8 along with a Custom build of the NvDsInfer component, responsible for inference using with the ONNX version of YoloV8.
I will suppose that the YoloV8 model files and the nvdsinfer_custom_impl_Yolo directory are stored in the /home/nebrass/tools/yolov8/. I will use this path later in the next steps.
NvDsInfer Configuration file
Inside the YoloV8 directory, we need to create a NvDsInfer configuration file that we will call yolov8_pgie_config.txt, with this content:
| |
I will explain the most important elements:
gie-id: the GPU device ID, as I have only one NVIDIA GPU card, the value is “0”. (counters start with “0”) 😁net-scale-factor: adjusts the pixel values of the input images to a standard range, usually between [0, 1] or [-1, 1]. This normalization aids the DL model in effectively processing the images for accurate results.custom-network-config: Specifies the configuration file for the YoloV8 model.model-file: Specifies the weights file of the YoloV8 model.model-engine-file: Defines the optimized TensorRT engine file to be used for inference.labelfile-path: Specifies the path to the text file that contains the labels (class names) for the objects the model can detect.batch-size: Sets the number of samples to be processed together during inference.network-mode: Defines the precision mode of the model inference (0 stands for FP32, 1 for FP16, and 2 for INT8). In themodel-engine-filevalue there is theFP32detail.num-detected-classes: Specifies the number of different classes of objects that the model can detect, in this case80.parse-bbox-func-name: Specifies the name of the function used to parse the bounding box information from the output of the YoloV8 model.custom-lib-path: Points to the custom library that contains the function to parse bounding box information. This library provides a custom implementation for handling the model’s output. This is the library that we built in the previous step.engine-create-func-name: Specifies the name of the function used to create the TensorRT inference engine. This function is typically provided in a custom library built in the previous step.
The hard part is over 😁 I understand, as software developers, we’re not fans of complex configurations.
The Python application
Our DeepStream application is in reality a simple console application written in Python. It will contain:

Our DeepStream application pipeline elements
Writing the components
We will use the Python Bindings, which are the libraries available from the DeepStream SDK (and from GStreamer obviously) for each component. For example, to create a pipeline, we have the Pipeline class from the Gst package:
| |
Then, the idea is to initiate and configure each component, then add it to the pipeline. For example, this code adds a new muxer to the pipeline:
| |
with:
nvstreammuxis the name of the Factory class that will create the componentStream-muxerthe name that I gave to mymuxerinstance
Note also, if I want to add a new component to the pipeline, it will not be automatically be invoked by the previous component, unless that I apply a link between the two components:
| |
You can notice here, that I created the streammux and pgie components, added them to the pipeline then I defined that the pgie is linked to streammux: that means that the output of the streammux will the input of pgie.
This is the mindset of developping GStreamer pipelines: You create a component, define its properties along with a link to the next component of the pipeline.
0️⃣ The Pipeline
To create the pipeline, the code is very easy to write:
| |
ℹ️ The
Gst.init(None)code initializes the GStreamer library, setting up internal path lists, registering built-in elements, and loading standard plugins. TheNoneargument means that no command line options are passed to GStreamer. This is usually one of the first calls made in a GStreamer application.
1️⃣ The RTSP Source
The RTSP Source will be an element in a source bin. To do so we have a function called create_source_bin():
| |
In this code, we have:
nbin = Gst.Bin.new(bin_name): Creates a newGstBinnamed source-bin-0.uri_decode_bin = Gst.ElementFactory.make("uridecodebin", "uri-decode-bin"): Creates a uridecodebinelementto handle the URI decoding.uri_decode_bin.set_property("uri", uri): Sets the RTSP streaming URL to the uridecodebinelement.uri_decode_bin.connect("pad-added", cb_newpad, nbin): Connects a pad-added signal to a callback function,cb_newpad.Gst.Bin.add(nbin, uri_decode_bin): Addsuri_decode_binto thebincalled nbin.
The GStreamer Bin created by create_source_bin() is inserted into the pipeline:
| |
2️⃣ Streammux
For the streammux we have in DeepStream the nvstreammux: a GStreamer plugin in NVIDIA DeepStream that multiplexes multiple input video streams into a single batch of frames for parallel processing. In our usecase, we only one RTSP source, but even with a single source, nvstreammux is useful for setting the resolution and batch size, and for compatibility with other DeepStream elements that expect batched input.
The creation code is quite easy:
| |
Based on the nvstreammux documentation:
width: If non-zero, muxer scales input frames to this width.height: If non-zero, muxer scales input frames to this height.
👉 The video resolution will be 1920x1080 (Full HD)
batch-size: Maximum number of frames in a batch.batched-push-timeout: Timeout in microseconds to wait after the first buffer is available to push the batch even if a complete batch is not formed.live-source: Indicates to muxer that sources are live, e.g. live feeds like an RTSP or USB camera.gpu-id: ID of the GPU on which to allocate device or unified memory to be used for copying or scaling buffers.
and if the ts_from_rtsp is true:
attach-sys-ts: Attach system timestamp as NTP timestamp, otherwise NTP timestamp calculated from RTCP sender reports.0: Disables attaching system timestamps.
3️⃣ The Glue between nvstreammux and the source_bin
The nvstreammux needs to get the RAW video from the source_bin, then a glue, linking the two items, needs to be defined: The src pad from the source_bin needs to be linked to the request pad from the streammux, which can be written like this:
| |
4️⃣ The Primary Detector
The Primary Detector, also known as PGIE, will be implemented using the famous NVIDIA nvinfer 🤠 or Gst-nvinfer for the GStreamer veterans 🪖🎖️
| |
Wait ! What is this yolov8_pgie_config.txt file 🧐
Well, the Gst-nvinfer gets control parameters from a configuration file, defined using the property config-file-path. Actually, it’s the relative path to the file that we created previously in the NvDsInfer Configuration section.
‼️ If your DeepStream python application is not located in the same folder, don’t forget to put the relative path of
yolov8_pgie_config.txtfile.
Then, we need to define the how the inference method tha will detects any cellphone that will appear during the RTSP Streaming:
| |
Then, the pgie_src_pad_buffer_probe method will look like:
| |
This method handles the business logic for object detection. When the inference engine detects an object with the same ID as a cellphone, the method displays a message informing the user that a cellphone has been detected.
The method can also be configured to perform more complex post-detection tasks, such as sending an email or Teams message with the frame to a surveillance agent.
ℹ️ The
PGIE_CLASS_ID_CELLPHONE = 67is ID of the cellphone object, listed in the line 68 (in the code we have 67 as we start counting from 0) of thelabels.txtfile, available with the YoloV8 model files.
Finally, we link the pgie to the streamux, before adding it to the pipeline:
| |
5️⃣ The Nvvideoconvert
The nvvideoconvert performs video color format conversion. It’s code:
| |
6️⃣ The Tiler
The code to create an nvmultistreamtiler instance, link it to nvvideoconvert and add it into our pipeline:
| |
7️⃣ The OSD
We need to add an nvdsosd instance to the pipeline:
| |
8️⃣ The PostOSD convertor
We will add an nvvideoconvert that will convert the output of the OSD step:
| |
9️⃣ The Caps Filter
We must have a capsfilter that will enforce that only video data in a only specific format can pass through this filter:
| |
The caps property that defines the type of data that the capsfilter element will accept. The value of video/x-raw(memory:NVMM), format=I420 specifies that the element will accept raw video frames in NVMM (NVIDIA Memory Management) memory format, with I420 color encoding.
1️⃣0️⃣ The Encoder
We need to add an nvv4l2h264enc element used for hardware-accelerated H.264 video encoding on NVIDIA GPUs.:
| |
This block defines two properties for the encoder:
bitrate: Sets the bitrate for encoding, in bits/seconds. The value is 4000000, which is 4 Mbps.gpu-id: Sets the device ID of the GPU to use for encoding. The value is 0, which is the first GPU.
ℹ️ These properties are important for controlling the quality and performance of the encoded video. A higher bitrate will produce higher quality video, but will also require more bandwidth to transmit.
💡 The bitrate is the amount of data that is encoded per second. It is measured in bits per second (bps). A higher bitrate will produce higher quality video, but will also require more bandwidth to transmit.
1️⃣1️⃣ The RtpPay
Then we need to add a `rtph264pay`` element that will package H.264 encoded video into RTP packets:
| |
1️⃣2️⃣ The UDP Sink
Finally, at the end of the pipeline, we need to add a udpsink element used to send data over a network via the UDP protocol:
| |
The properties defined in our udpsink:
- host: The destination IP address for UDP packets. Here, we are sending the packets to the multicast address
224.224.255.255, which will send them to all hosts on the network. - port: The destination port for UDP packets.
- async: Disabling asynchronous state changes; operations are blocking.
- sync: Enables synchronization to the clock, ensuring data is output in sync with the pipeline clock.
- qos: Disables Quality of Service handling in the pipeline.
1️⃣3️⃣ GStreamer Pipeline State Management
To be able to receive notifications from GStreamer about events such as pipeline state changes, errors, and messages from elements in the pipeline, we need to add this block:
| |
Let’s explain this code:
- The
GLib.MainLoopclass is a GStreamer event loop. It is responsible for processing events and dispatching them to the appropriate callback functions. - The
bus.add_signal_watch()function adds a signal watch to the bus. This means that the main loop will be notified whenever a signal is emitted on the bus. - The
bus.connect("message", bus_call, loop)function connects thebus_callfunction to themessagesignal on the bus. This means that the bus_call function will be called whenever a message is posted on the bus. - The
bus_callfunction is a callback function that you can implement to handle bus messages. It typically checks the type of message and performs the appropriate action. For example, if the message type isGST_MESSAGE_EOS, then thebus_callfunction might stop the main loop.
1️⃣4️⃣ Start the streaming process
The last step is to add this code:
| |
This code:
- Starts the RTSP streaming server by creating a new
GstRtspServer.RTSPServerobject and setting theserviceproperty to the listening port number. The server is then attached to the default bus. - Creates a media factory, used to create new media streams. The media factory is configured to launch a GStreamer pipeline that reads from a UDP source and encodes the video stream using the H264 codec.
- Adds the media factory is then added to the RTSP streaming server. This is done by calling the
get_mount_points().add_factory()method on the server object. - Starts the GStreamer pipeline by calling the
set_state()method on the pipeline object and passing in theGst.State.PLAYINGstate. - Runs the event loop by calling the
run()method on the loop object. The event loop will continue to run until anExceptionis raised or the loop is stopped manually. - Once the event loop has stopped, the GStreamer pipeline is stopped by calling the
set_state()method on the pipeline object and passing in theGst.State.NULLstate.
Running and testing the DeepStream application
To test the DeepStream application, we need to have a sample RTSP stream link first. There are some samples available on the internet, such as BBC, NASA, and Live Earth Cam, but none of them worked for me. This is why I decided to create my own RTSP Stream, using my phone, Wow ! 😁 I used an application that turns a mobile phone into a wireless IP camera via the built-in RTSP and HTTP server. The application is called IP Camera Lite for iPhone or IP Camera for Android.
Local IP Camera showcase
The RTSP Stream video of the IP Camera Lite, played on VLC Player looks like:
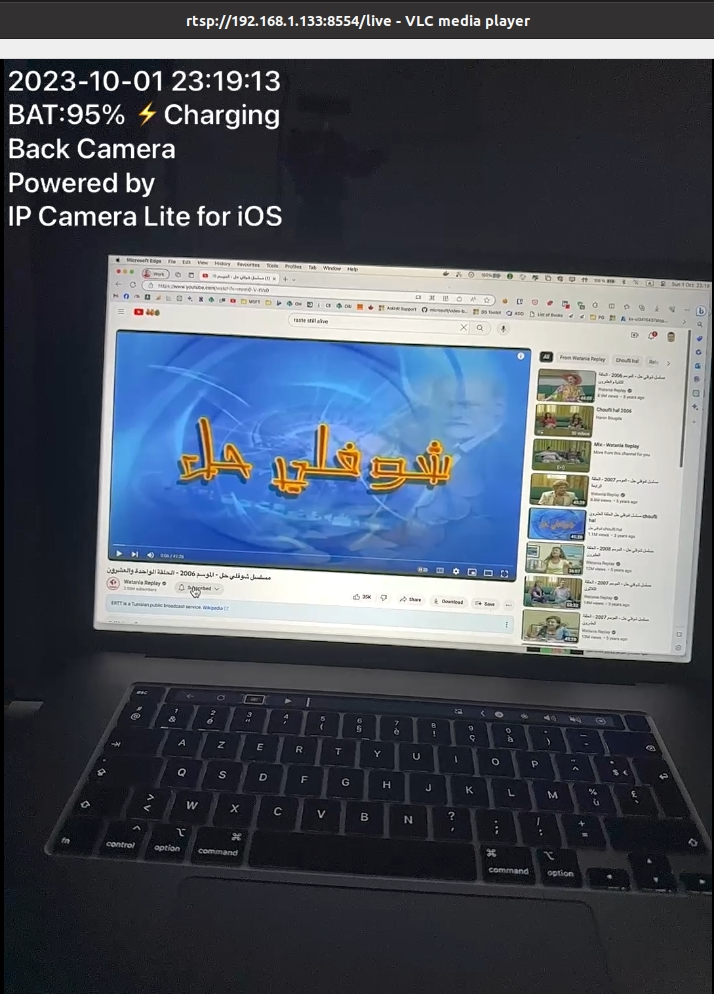
IP Camera Lite rtsp stream on VLC Player
When running the application, it will provide an URL on which the RTSP Stream is reachable; in my example rtsp://192.168.1.133:8554/live. This is will be the URL that I will pass as input to my NVIDIA DeepStream Python application.
Testing the Object Detection on the local RTSP Stream
To run the application, just run it as any other Python application:
| |
Then the Python application will:
- Ouput the logging of the pipeline creation:
| |
- During the first execution of the application, it will build the
model_b1_gpu0_fp32.enginefile:
| |
- The object detection logs will start to come up:
| |
ℹ️ You can notice that the RTSP Timestamp is wrong in the beginning, but after a synchronization, it became correct.
And finally, the best for the end ! The application is detecting all objects, and when it detects a cellphone, a special text is shown on the OSD Cellphone is detected!:
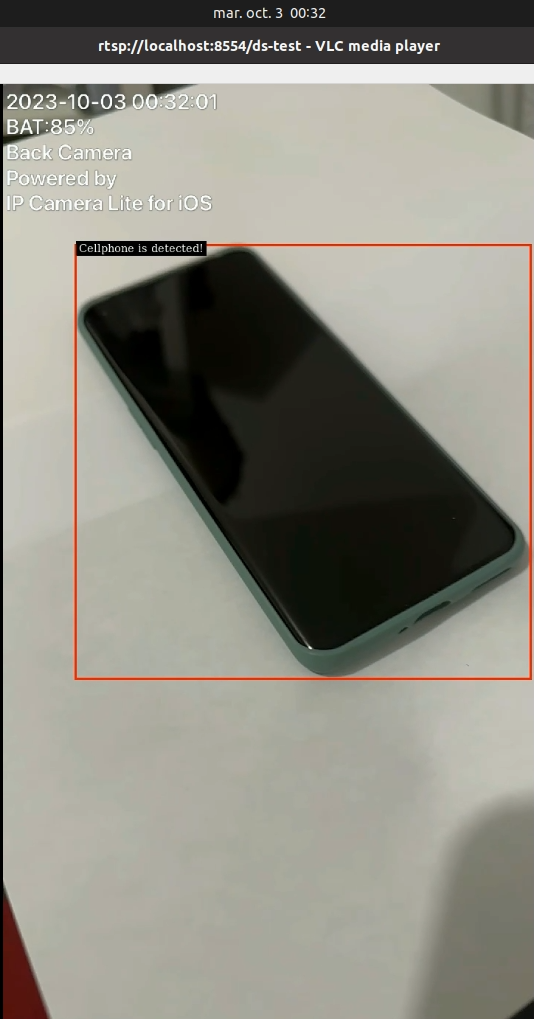
Testing the Object Detection
ℹ️ The full code of the application can be found in the project repository on my Github.
Conclusion
Here I am, at last, reaching the finale of this blog post. Honestly, this has been one of the most “challenging” posts I’ve crafted. NVIDIA DeepStream emerges as a stellar solution for concocting Video Analytics solutions efficiently, aligning with the finest patterns and tools. Yet, it demands a hefty slice of time for mastering. Upskilling on DeepStream turned out to be the longest leg of my journey while piecing together this Proof-of-Concept.
Given more time, I would undoubtedly continue unraveling the mysteries of this remarkable solution. My exploration of this SDK commenced with version 6.1. However, as I embarked on penning down this blog post around March/April, version 6.2 was the latest. Lo and behold, come publishing time, version 6.3 had rolled out, which is the version spotlighted here. I dabbled with the variations across releases, and each upgrade to my installation brought along a delightful boost in performance.
Getting DeepStream up and running is no cakewalk—it’s a tricky and tough endeavor. Patience is your comrade, for any hiccup in updating a dependency can send the system into a tailspin. And… ! Yes ! You guessed it right! A fresh install becomes your next rendezvous.
If you are charting through advanced scenarios or brewing analytics apps using NVIDIA DeepStream, I’m all ears. Please share your exploits; I’m thoroughly intrigued by real-world applications.
Cheers!